Nothing About Us Without Us
Developing Innovative Technologies
For , By and With Disabled Persons
Part Two
CREATIVE SOLUTIONS FOR WALKING
AND FOR LEG AND FOOT PROBLEMS
CHAPTER 20
A Wooden Skeleton for Teaching
Functions of Muscles and Bones
The Human Body: Understanding its functions, rather than memorizing big words. For rehabilitation workers - whether at the home, community or professional level - it helps to have a basic understanding of the human body, and how it works. Community based rehabilitation tries to de-mystify scientific knowledge, and to share it in a simplified form anyone can understand and use. To learn about the structures of bodies (anatomy), it is important to understand what muscles and bones do, and how they interact to make the body work, rather than to learn a lot of big Latin names for body parts.
The FLEXIKIN - a Good Teaching Tool, but with Limitations
Years ago, PROJIMO invented a jointed cardboard doll called a Flexikin to help teach families about body joints and how they work. Its main use was to motivate the family of a child with contractures (joints that do not straighten) to patiently keep doing the necessary stretching exercises.

Unfortunately, progress is often very slow. So the family tends to stop the exercises. But with a flexikin, the family can measure and record the gradual straightening of joints. This motivates both the child and family to keep doing the exercises.
|
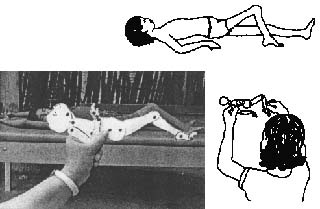
To use the Flexikin for a child with a knee contracture: 1. Have the child stretch the limb as much as possible. 2. Hold the Flexikin at a distance between your eye and the child, so that it appears to be the same size as the child. 3. Line up the flexikin to be exactly in line with the child's joints.
4. Trace the flexikin onto a sheet of paper. Repeat every few days. This way, even those who cannot read and write can see and record the child's progress. |
The flexikin can be used to teach about and record the different body positions and deformities related to a variety of disabilities. The arrows in these pictures show possible problem areas.

MAKING THE FLEXIKIN MORE EASILY - WITH HOME-MADE PLASTIC RIVETS
The original design for Flexikins used small metal rivets to join the movable joints. However, community based rehabilitation workers in many countries complained that they did not have such rivets. This problem was solved by a CBR workshop participant in Brazil, who created home-made plastic rivets from small plastic rods (those used for stirring drinks).
|
With his pocket knife he cut the plastic rod into small bits.
|
He punched holes in the ends of the cardboard bones and joined them with the plastic bits.
|
With a cigarette lighter, he heated the knife and pressed it against the ends of the plastic bits. This melted and spread the ends, so that they held securely.
|

With these plastic rivets, CBR programs almost anywhere can make and use flexikins.
A Plywood Skeleton to Learn about How the Body Works
(Functional Anatomy)
If it is true that a drawing is worth a 1000 words, it is also true that a model that moves and simulates real life can be worth a 1000 drawings.
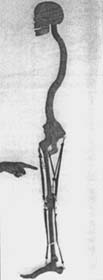
To help learners "see for themselves" how muscles and bones move and work, PROJIMO has developed a plywood skeleton, complete with joints that bend and straighten.

Strips of rubber inner-tube, which stretch and contract like muscles, are attached to the plywood bones by string tendons. (Like real tendons, the string does not stretch and contract as do the rubber muscles.)
The model skeleton can be used to teach basic principles which are useful for planning appropriate therapy, bracing, and special seating.
Learners can move the joints and discover how muscles stretch and contract to move different parts of the body. By replacing some muscles with weak ones, or with contracted ones (using strips of leather instead of rubber), they can see how muscle-imbalance and/or contractures cause abnormal positions or deformities.
To understand why it is more effective to do certain exercises with the body or limb in one position and not another, it helps to know something about important muscles and tendons, and where they attach to the bones. This knowledge can also be helpful for daily activities, like dressing. For example, consider this mother of a child with spastic cerebral palsy.
How can you help the mother (or a rehabilitation worker) understand why it is easier to put on the brace with the knee bent? You can explain that 1) Bending the knee helps to break the spastic pattern and relax the leg muscles; and 2) When the knee is bent, the foot bends up more, because some of the muscles that pull the foot down are attached to the lower end of the thigh-bone. When the knee is bent, a tight calf-muscle becomes looser, because the distance from the thigh-bone to the heel is shorter.
Pictures can make this clearer.
A moving model can make it clearer still.
The above drawings help. However, people learn better when they see and handle a model with bones and muscles that move.
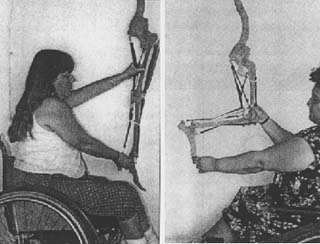
In these photos, Conchita and Mari use the plywood skeleton to teach stretching exercises to the mother of a girl with cerebral palsy. The girl stands and walks on tiptoe due to tight heel cords and early contractures. Mari shows the mother why it is easier to lift the foot when the knee is bent.
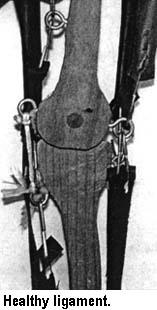
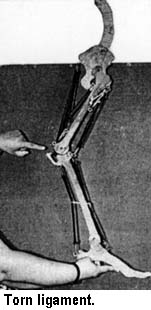
In addition to muscles and tendons, the model has ligaments (non-stretching cords that connect bone to bone) made of string. Important ligaments behind the knee bind the thigh-bone to the lower leg-bone. These cords prevent the knee from bending too far back. By lengthening or cutting the string-ligaments on the model, learners can see what happens when the real ligaments get stretched or torn (see pages 89 and 94).
The skeleton can also be used to show how hip-flexion contractures can be caused by tight muscles between the front edge of the hips and the thigh bone. To demonstrate this, the rubber band which represents the muscle is replaced by a strip of leather that represents a tight muscle that no longer stretches.
When the muscles between the front of the hips and the thighs are tight, the hip girdle tilts forward, causing a sway-back when standing. Such contractures should be avoided through stretching exercises and good positioning. (See pages 16 and 220.)

When the muscle between the front of the hip and the thigh bone is normal, the hip girdle stands up straight and the child's back is in a straight line with her legs.
A wealth of useful knowledge can be gained by this hands-on model.
Because this methodology involves people making their own observations and drawing their own conclusions, it falls into the category known as discovery-based learning.
Nothing About Us Without Us
Developing Innovative Technologies
For, By and With Disabled Persons
by David Werner
Published by
HealthWrights
Workgroup for People's Health and Rights
Post Office Box 1344
Palo Alto, CA 94302, USA