Disabled Village Children
A guide for community health workers,
rehabilitation workers, and families
PART 3
WORKING IN THE SHOP:
Rehabilitation Aids and Procedures
CHAPTER 66
Designs for 6 Basic Wheelchairs
There are dozens of designs for low-cost, 'appropriate technology' wheelchairs. Some are lower cost and more generally useful than others. In PROJIMO, we have built many different wheelchairs. In this chapter we give designs for 6 of the ones that we have found most useful. Each has advantages and disadvantages.
|
AHRTAG wood wheelchair made from a child's chair, bicycle wheels and axles at front, one rear caster |
|
Advantages: the simplest and one of the cheapest chairs to make; easy to modify or adapt; very little welding needed; can be built in one day by someone with some carpentry skill; low cost. Disadvantages: Single, small rear wheel makes it difficult for either the child or helper to push over rough ground or up curbs. Fixed footrest makes it hard for child to climb in and out without tipping chair forward when weight is on footrest. Sideboard makes transfers to side and lifting child from behind difficult. |
|
Re-bar and woven plastic wheelchair steel construction rod frame with woven plastic seat, back, and footrest |
|
Advantages: simple design; fairly low-cost re-bar is easy to bend; plastic woven seat is comfortable and easy to clean; slide-away footrest makes getting in and out easier. Disadvantages: Builder needs welding skills, relatively heavy and not as strong as tubing chairs. Big bumps may bend the chair out of shape. |
|
Square metal tube wheelchair frame bolted together |
|
Advantages: strong, stable metal chair that can be built with nuts and bolts (welding needed only to attach front wheels). Flat surfaces make it easier to put on wood adaptations; fairly low cost. Disadvantages: more work and skill needed than for above chairs; design more complex; slightly higher cost than wood chairs. |
|
Wheelchair with lying board made of steel tubing, with removable wood lying board |
|
Advantages: useful for active child who must lie face down to heal sores or stretch contractures. When board is removed, it is a regular wheelchair, low cost; very adaptable. Disadvantages: requires welding (but a simpler model can be made of wood); does not fold; board takes up a lot of space; stiff ride. |
|
Plywood frame wheelchair with 20 inch bicycle wheels and axles, and 2 front casters |
|
Advantages: attractive; lightweight; low cost, easy to make and adapt. Caster wheels in front (not in back) make it easier to go over rough ground and curbs. Adjustable push-away footrest makes positioning and getting in and out easy. Disadvantages: Plywood and double casters increase cost (although it is still a cheap chair). Plywood (if not marine grade) may come apart in wet weather. Bicycle axles may bend or break with a heavy child or rough use. |
|
Metal tube folding wheelchair made from thin-wall steel tubing; strong axles with machinery bearings |
|
Advantages: Chair folds for transporting or storage; very tough; flexible design good for uneven surfaces; good for side transfers; a very high-quality chair if well-made. Disadvantages: needs more skill (tube bending, welding, exact fittings, wheel spoking, etc.) to build; relatively costly; hard to adapt. |
Tools needed for making wheelchairs
Ideas for setting up a workshop for disabled workers are discussed in Chapter 57 and Page 603 of Chapter 64. How you equip your workshop for making wheelchairs will depend on (1) how much money you have (or can borrow) to do it, (2) the kinds of chairs you hope to build (metal or wood), (3) the skills, physical and mental abilities, learning potential, and responsibility (regarding safety) of the workers, (4) the availability of electricity and power tools, (5) how many persons will be working, and (6) how many chairs you hope to produce.
Here we list the basic equipment you will need for making the 6 wheelchairs described in this chapter. Many choices are possible. More specialized parts of the work can be done by outside craftspersons. For example, in a wheelchair production center in Belize, axles must be machine tooled on a metal lathe. Local machine shops cooperate by doing this free.
|
CODE |
TYPE OF CHAIR |
|||||
|
wood chair |
re-bar and woven plastic |
square metal tubes with wood seat and back |
wheelchair with lying board |
plywood |
round metal tube Terms |
|
|
TOOLS REQUIRED |
N |
AN |
N |
AN |
(N) |
AN |
|
tubing bender |
AN |
AN |
||||
|
welding (brazing) equipment |
(N) |
AN |
N |
AN |
(N) |
AN |
|
metal saw |
(N) |
AN |
AN |
AN |
(N) |
AN |
|
wood saw |
AN |
AN |
AN |
|||
|
hammer |
AN |
AN |
AN |
AN |
AN |
AN |
|
wrench (set or adjustable) |
N |
N |
AN |
AN |
N |
AN |
|
metal file and/or grinder |
(N) |
AN |
AN |
AN |
(N) |
AN |
|
screwdriver |
AN |
AN |
AN |
AN |
AN |
AN |
|
sewing equipment (hand or machine) |
? |
N? |
N? |
|||
|
drill (hand or electric) |
N |
? |
AN |
AN |
N |
AN |
|
drill bits for metal |
AN |
AN |
AN |
|||
|
drill bits for wood |
AN |
AN |
AN |
|||
|
spoke wrench |
? |
? |
N |
N |
N |
N |
|
bicycle pump |
? |
? |
? |
? |
? |
? |
|
center punch |
N |
N |
N |
N |
N |
N |
|
tape measure |
N |
N |
N |
N |
N |
N |
|
carpenter's square |
N |
N |
N |
N |
N |
N |
Terms for metal tube or bar used to build wheelchairs
-
Thin-wall refers to thin steel tubing often used for electrical wiring work and sometimes for lightweight metal furniture.
-
Thick-wall refers to heavy weight pipe such as the one used in plumbing.
-
Re-bar refers to solid metal rod, usually used to reinforce cement.
Jigs or guides for more exact welding
For making the metal tube chairs and the welded wheel mounts and handrims of any of the chairs, your work will be easier and more exact if you make or purchase certain 'jigs' or guides to hold parts in the right place while you weld them. For example, to weld the front caster fork you can make a 'jig' like this.
Details on 'jigs' and other techniques for making different wheelchair parts are well described in Ralf Hotchkiss's book Independence Through Mobility (see reference on Page 604). We strongly recommend it to any group planning to make wheelchairs.
|
Notes on measurements For some of the wheelchair designs in this chapter, we give the measurements for a standard child's or adult's model. Be sure to adapt the measurements to the size and needs of the particular child. |
In many countries inches (") are used for measurements of certain things, and centimeters (cm.) for others. We therefore also use both. Centimeters is abbreviated cm. and inches is abbreviated ". Two inches is written 2". 1" equals 2.54 cm. You can use the scale on the edge of this page (and on the inside back cover) to change inches to cm. |
AHRTAG WOOD WHEELCHAIR
(Somewhat modified from AHRTAG manual, see Page 604.)
The AHRTAG wheelchair is built onto an ordinary child's wood chair. Measurements should be adjusted to the child's needs.
A webbed plastic seat lets air move through it and can be easily cleaned.
It uses standard 20 " x 1 3/4 " bicycle wheels and axles.

Basic carpentry tools are needed to build this wheelchair. It can be made in one day by someone with basic carpentry skills. The local blacksmith may be able to help weld together the wheel supports if you cannot. It is easy to add positioning aids or make other adaptations. The cost in Mexico using new materials is about US $40.00.

|
AXLES
WARNING: Use standard bicycle axles this way only for children under 20 kg (50 lbs.). A heavier child, or rough use, will bend or break the axle.
For children over 20 kg., use a stronger axle (see Page 623). Or support the bicycle axle from both sides (see Page 598). |
|
CASTERS
This backward extension distributes weight better and keeps chair from tipping backward on hills. Two back casters are more stable and make it easier for the wheelchair to go up curbs.
|
For brake designs, see Page 601 and 623. For other pictures and models of the AHRTAG wheelchair, see Page 526, 592, 600, 601, 604, and 624.
RE-BAR AND WOVEN PLASTIC WHEELCHAIR
Total cost using new parts is about US $40.00.
Weave back, seat, and footrest with ribbon, local wicker, cane, rattan or polyethylene plastic.
Or use thin, lightly stretched strips of car inner tube, or canvas webbing.
For front fork and casters, use factory made casters or make your own (see above, and Page 597, 619, and 623).
SLIDE-OUT FOOTREST
For axle designs see Page 597, 598, 615, and 623.
|
MATERIALS NEEDED
|
SQUARE TUBE WHEELCHAIR
This wheelchair, like other steel tube chairs, should use only thin-wall tubing. Total cost in Mexico using new parts is about US $40.00. To keep costs down, check with various sources of materials and ask at small fix-it shops for advice and possibly even some free scrap material. Metal scrap heaps are great for materials.
sealed bearing hub (see Page 597, 598, and 623)
caster wheel mount (see Page 616, 619, and 623)
|
MATERIALS NEEDED
|
|
HOW TO MAKE YOUR CHAIR
|
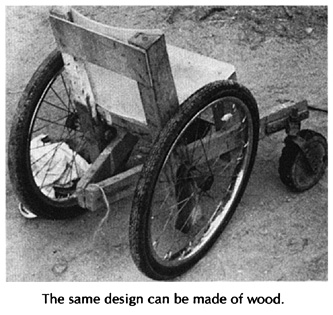
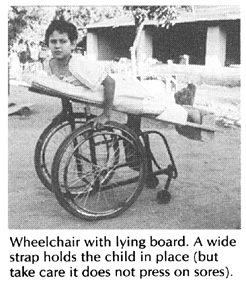
WHEELCHAIR WITH LYING BOARD

This is useful for an active child who must lie face down to heal pressure sores or to stretch hip and knee contractures.
The board is sloped so that the child can play, look ahead, and move about more easily. If necessary, you can make the lying board adjustable so that the child can rest lying flat. This helps to improve circulation and to prevent swelling of the feet.
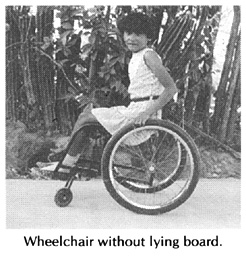
After the pressure sores heal, the lying board can be removed and the frame is easily adapted to form a lightweight wheelchair. The cost for materials in Mexico is about US $40.00.
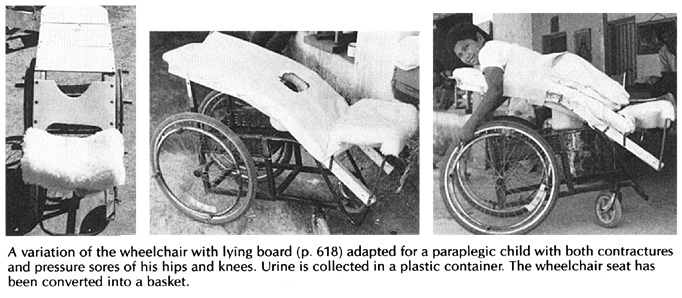
The design we show uses a simple, non-folding steel tube wheelchair frame with a wooden lying board mounted on top. However, many other designs are possible. (See, example, the photo of a lying and standing wood wheelchair on Page 190.)
|
WITH LYING BOARD Lying-board should be well padded with thick foam rubber. If necessary, cut out a hole for urine to pass through (line hole with thin plastic so the foam rubber stays dry).
For tall persons, place the casters farther from the big wheels to help prevent tipping. |
|
WITHOUT LYING BOARD
|
THE LYING BOARD
SIDE VIEW
Attach thin wood or plywood boards with small screws so that they can be easily adjusted to leave open spaces under bony parts or sores.
TOP VIEW
Make the board and wheelchair just a little wider than the child's hips.
The board attaches to the chair with angle irons or wing bolts. You can make wing bolts by brazing a stiff bent wire to a bolt.
FOOTREST
Use thin wood or plywood. (Pad sides and bottom well to prevent sores. Examine feet daily.)
FRONT CASTER WHEEL
REMOVABLE HANDLE
You should now have enough information to make a wheelchair with a lying board without step-by-step instructions. Adapt it, and make it the size to fit the child that needs it.
|
CAUTION: Remember that a child who has some pressure sores can easily get new ones. Be sure the child lies and sits so that there is little or no pressure over bony places. Examine her whole body at least once a day and try to keep her dry. |
![]()
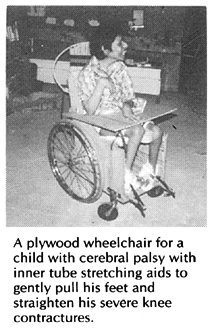
PLYWOOD FRAME WHEELCHAIR
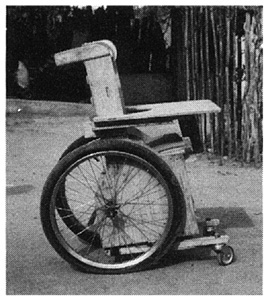
This can be easily built by someone with basic carpentry and welding skills. (Cost in Mexico using new materials is about US $40.00.) Positioning aids (head rest, hip pads, etc.) can be easily added. The chair can be designed to meet a child's particular needs. For example, if the child sits well without extra support, the tops of the side pieces can be removed to allow more freedom of movement.
A plywood frame is a low-cost alternative to metal. However, if not made well, or if left out in the rain, the chair may weaken and the plywood can split. As with any wheelchair, it must be protected from misuse, periodically examined for weaknesses, and promptly repaired.
See model on Page 621
For active children the wheelchair can be strengthened by reinforcing all joints and by adding strong hubs and axles (see Page 623).
|
HOW TO MAKE YOUR CHAIR
|
|
MATERIALS NEEDED
|
These measurements are for a 4 to 8-year-old child.

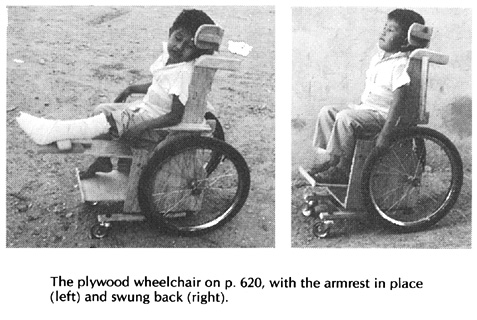
A plywood wheelchair with many adaptations
This wheelchair has a variety of additions sometimes needed for a small child who has poor body control, head control, and urine or bowel control. The head support and armrests fit into wooden holders and can be easily removed. A lap table can be easily added. Holes can be cut out for chest and hip straps for extra support.
|
head positioner 
swing-up armrests
padded hip and shoulder positioners
potty bowl holder with leg separator Pull out to empty potty.
Tree branch holds stiff legs apart. lap table
The lap table should be cut to fit closely around the wheelchair sides. The same wooden brackets for the armrests keep this table in place. If the table wobbles, you can use small slats to strengthen the table. If the knee separator is made a bit higher, the table can rest on top of it and prevent any dips. |
SPRINGS FOR ALL 4 WHEELS
This plywood wheelchair has a springy ride. Old inner tube rubber strips connect the rear wheel axle to the wood strips holding the front caster wheels. These wooden strips should be strong enough to withstand the springy motion of the front casters.
Special cut-away slots allow the rear axle to move up and down freely. Other cut-away slots in the bottom of the wheelchair allow for the inner tube strips to be wrapped around the wooden caster strips. The tighter the inner tube strips are wrapped, the less bouncy the ride becomes.
|
To build your own strong rear hub and axle, see Page 623. If you want to use hubs from bicycle wheels, see Page 597. |
WHIRLWIND STEEL TUBE WHEELCHAIR
The whirlwind (ATI-Hotchkiss) wheelchair is a very strong lightweight folding chair. On rough ground it rides more easily and lasts longer than more costly factory-made chairs. If it breaks, it can be fixed by the neighborhood metalworker. It is narrow and helps the rider to move about crowded rooms.
The frame of this chair is made of thin-wall steel tubing that is easy to shape by someone with basic mechanical and welding skills. It can be built in about 4 days in a small metalworking shop. More than 10 groups of disabled mechanics throughout Latin America are building this wheelchair- often at less than a quarter the cost of imported wheelchairs.
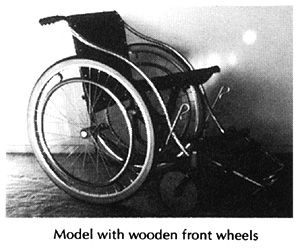
Most materials for this chair can be obtained locally. It uses standard 24" (or 26") bicycle wheels. The extra strong hubs (see Page 623) use standard small machinery bearings (which can often be obtained used for free or at low cost from electric machinery repair shops). The axles are 5/8" (1.6 cm.) steel bolts. Seating is canvas (heavy cloth). If the small front wheels are not available, you can make them out of wood (see Page 597 and 616).
The curved fender bar that follows the shape of the tire makes transfers easier. The lightweight folding footrests are narrow at the front, for moving more easily in crowded spaces.
Plans for making hubs, casters, and brakes are on the next page. Complete plans for making this wheelchair are in the book Independence Through Mobility (see Page 604). The book is essential for anyone planning to build this chair.
|
MATERIALS NEEDED
|
|
FOLDING FOOTREST 
|
X-BRACE
|
For a photo of this chair, see Page 536.
DETAILS OF HOW TO MAKE WHEELCHAIR PARTS
(can be used with many wheelchair designs)
|
HEAVY-DUTY WHEEL HUBS
Note: Used sealed bearings with a 5/8" inner diameter can often be obtained free or at low cost from electrical tool and appliance repair shops. These used bearings often last longer than standard wheelchair bearings. 
To attach the heavy-duty hub to a wood chair, you can weld the thick-wall tube to a metal plate. The bigger the plate is the stronger the mount.
|
|
|
CASTER FORK AND HUBS
Mount the caster axle at least 7 cm. behind bolt. This helps prevent 'flutter' at higher speeds. |
|
|
BRAKES
For other brake designs, see Page 601. |
|
|
SEAT AND BACK MADE OF CANVAS (strong cloth) Cut canvas twice as wide as seat or back, allowing 4 cm. extra on sides (for seams) and at least 20 cm. longer on length. Sew canvas into a tube.
CAUTION: Measure carefully. On a folding chair, |
- For designs of other wheelchair parts, see the following pages:
- wheels: 594, 596, 597, 616, 619
- footrests: 600, 616, 619, 621, 622
- seats and backs: 595, 615, 616, 617, 619, 620
- axle mounts: 597, 598, 615
- tires: 596
- handrims: 601
- armrests: 599, 621
- cushions: 200, 609
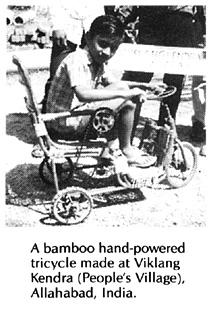
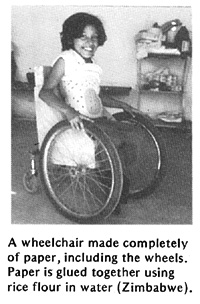
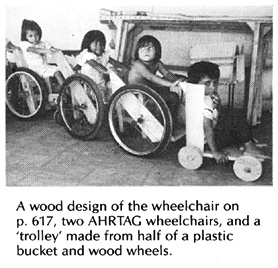
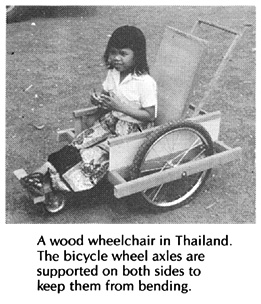
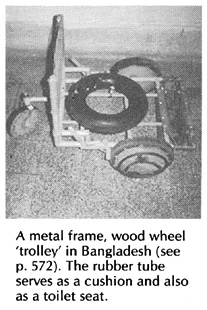
Examples of locally made wheelchairs
![]()

For more examples of wheelchair designs, see Page65, 86, 98, 189, 190, 229, 288, 343, 430, 441, and 526.
Disabled Village Children
A guide for community health workers,
rehabilitation workers, and families
by David Werner
Published by
The Hesperian Foundation
P.O. Box 11577
Berkeley, CA 94712-2577