WHEELCHAIR
A. Main steps in making a wheelchair
- Prepare both sides of the chassis.
- Assemble the chassis.
- Prepare the lateral posts.
- Prepare the foot rest and fix the front wheel.
- Assemble the lateral posts and the front part of the chassis.
- Machine the axle.
- Weld the fixing flaps and fix the axle.
- Make the push rims.
- Assemble the axle and the wheels under the chassis.
- Install the armrests.
- Cover the backrest, seat and footrest with bamboo or other material.
- Make and install the brakes.
B. Illustrated notes on making a Handicap International (HI) wooden wheelchair (*1)
The Handicap International (HI) wooden wheelchair was first produced by an HI volunteer working in Kompong Cham province, Cambodia, in 1994. While travelling around the districts throughout Cambodia, this volunteer had observed that there was a large number of the population disabled in both lower limbs (congenital malformation, polio, paraplegia, double amputation). It was thus decided that HI, which was already working in the heart of the provinces and therefore close to the patients, would develop a locally made wheelchair at a low cost.
While recognizing that two other NGOs manufactured wheelchairs in metal (metal/wood) at a cost of between US$ 70 and US$ 120, HI decided to go ahead with its wooden model which cost only US$ 30. Wood was chosen as the most suitable material due to the conditions at the time, as well as its low cost and because it was easy to work with. Only three parts needed for production were purchased in Phnom Penh: the other components were available in the local market. This allowed for a decentralization of production and facilitated distribution and maintenance.
The wheelchair itself is a new type that was designed maintaining the basic materials, the two big rear wheels and one small front wheel of the existing model, keeping in mind the criticisms in this regard.
Since 1994, the HI wooden wheelchair has been distributed throughout Cambodia. As this type of wheelchair is appropriate for paraplegic persons, it is especially used by the HI Paraplegic and Quadriplegic Centre in Battambang.
Specifications of the Wheelchair
Wheelchair with three wheels (2 big wheel drives and a small guiding wheel in front) and a rigid wooden frame.
| Big model in cm. | Small model in cm. | |
| Seating with a posterior angle of 11.5º (20%) | ||
| width | 37 | 32 |
| depth | 36 | 32 |
| seat height/foot rest | 38 | 31 |
| seat height/ground | 59 | 52 |
|
Back rest with a posterior angle of 11.5º (20%) (perpendicular to the seating) |
||
| width | 37 | 32 |
| height | 30 | 27 |
| Foot rest: horizontal trapezoidal pallet | ||
| average width | 23 | 21 |
| Arm rest: fixed: | ||
| front height | 8.0 | 8 |
| rear height | 21.5 | 20 |
| Rear wheels: inflatable, drive | ||
| diametre | 66 | 59 |
| carrossage 6º (10%) | - | - |
| rear line | 58 | 52 |
| Front wheel: unique guiding bend | ||
| diametre | 16 | 26 |
| wheel base | 61 | 54 |
| Hand axle with 4 connecting points |
|
|
| diametre | 46 | 46 |
| 2 uncoupled brakes on the 2 wheel drives |
|
|
| Pressure handle: double lateral |
|
|
| Weight: | Kg | Kg |
| frame | 6.0 | 5.3 |
| wheel and hand axle | 8.4 | 8.2 |
| wheel drive axle | 1.3 | 1.1 |
| front wheel | 2.4 | 2.4 |
| bamboo | 0.8 | 0.6 |
| screws | 0.6 | 0.6 |
| Total | 19.5 | 18.2 |
Big Model
| Designation | Quantity | Price (US$) (March-1994) | Origin |
| Hub | 1 pair | $2.7 | Phnom Penh (PP) market |
| Rim | 1 pair | $3.5 | PP market or local market |
| Spokes | 64 | $2.2 | PP market or local market |
| Tyre | 1 pair | $2.6 | PP market or local market |
| Inner tube | 1 pair | $2.6 | PP market or local market |
| Rubber strip | 1 pair | $2.6 | PP market or local market |
| External wheel setting | 1 pair | $1.6 | PP market or local market |
| Ball bearings | 4 | $2.4 | PP market or local market |
| Wheel axle | - | 6000 R | local market |
| Screws and nuts for axle | 4 | 720 R | PP market or local market |
| Push rims | 3 m | 8000 R | PP market |
| External axe | - | 2500 R | local market |
| Front wheel | 1 | $5 | HI stock or PP market |
| Wood 0.05 x 0.03 m | 9 m (.0135m) | $1.35 | provincial department for social action or local market |
| Bamboo | 10 m | 1000 R | provincial department for social action or local market |
| Cast iron for brakes | 0.5 m | 200 R | PP market or local market |
| Wooden screws 4 x 20 mm | 4 | 80 R | PP market or local market |
| Wooden bolts Vietnam 6 x 80 mm |
20 | $1.3 | AS national stock or local market or PP market |
| Washer dia 6 mm | 20 | - | - |
| Nails 20 mm | 80 | 100 R | AS national stock or local market or PP market |
| Bolts and nuts 5 x 25 mm | 8 | 400 R | - |
| 15 mm steel x 2 mm | 0.72 m | 19860 R | - |
| Total | - | $30 | - |
Drawings
- Both Sides of the Chassis -BM-1
- Assimbling the Chassis -BM-2
- Preparetion of the Lateral Posts -BM-3
- Foot Rest / Fixing the Front Wheel -BM-4
- Assembling the Lateral Posts and the Front Part of the Chassis -BM-5
- Wheelchair Axle -BM-6
- Wheelchair Axle -BM-7
- Push Rims -BM-8
- Assembly of the Axle and the Wheels under the Chassis -BM-9
- Place Armrests and the Bamboo Cover -BM-10&11
- The Brakes -BM-12
C. Illustrated notes on how to make a wooden wheel (*2)
Materials: Wooden planks, Glue, Nails and Old Tire( bicycle or car).
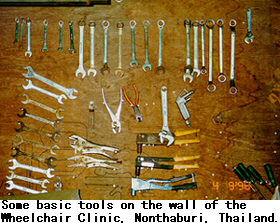
Basic Tools: Saw, Hammer, Book (square), Sting (tape measure).
Extra Helpful Tools: Drill, Chisel, Wood file, Wood plane, Clamps.
- Select your wooden planks.
The thickness of your planks will equal half the finished width of the wheel.
Cut your planks to length:- 4 x (Diameter of the wheel plus 25 mm).
- 8 x (Half the diameter of the wheel plus 25 mm).
- NB: It is helpful if these eight pieces are wider than the four.
- Take each of the four long planks.
Remove the central square to half the depth of the wood.
- Place the planks together with glue to form a cross.
Use a book to keep angles at 90 degrees.
If you nail the cross together, keep the centre clear.
You will need to drill a hole for the axle.
Repeat with the other two planks.
- Fit the crosses together.
Drill a small hole in the centre of the crosses.
Put a nail in the drillhole and turn one cross a quarter turn.
This will make each spoke at 45 degrees apart.
- Take the remaining eight wooden planks.
Cut two of the corners off the planks at 45 degrees, one third of the width.
- Fit four of the above planks on to one side of the wheel spokes to form a square.
Glue well and nail in the centre of the planks into the middle of the underlying spoke.
Turn over and repeat.
- Clamp (or rock for a weight) and leave until glue is dry.
- Draw a circle to mark the edge of the wheel.
Place a piece of wood with a nail in one end.
The nail goes into the axle hole.
The other end has a hole in it for a pencil or nail to go through, now use like a compass.
- Cut to the rimline.
You do not have to have the wheel perfectly round for it to work: -
Simply cut the extra wood off.
- Fit an old tire to the rim and attach by nailing into the side of the wheel.
D. Adjustments on wheelchairs (*3)
People who ride wheelchairs come in all shapes and sizes. So should wheelchairs. Many commercial chairs although the basic models are standardized come with adjustable footrests, armrests, and alternative positions for the rear hubs.
Hub position. By changing the up-and-down position of the hubs in relation to the chair, the height and tilt of the seat can be changed. By changing the front-to-back position of the hubs, the balance of the chair can be changed. For example, a persons without legs may need the rear hubs mounted further back to avoid falling over backwards when going uphill.
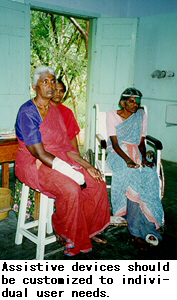
An advantage to producing wheelchairs in small, community-based shops is that often they can be custom made. Rather than adding a lot of mechanisms for adjustments to meet different user needs (which add to both weight and cost), each chair can be personalized from the start, to meet the specific need of the intended user. If the wheelchair makers are also wheelchair riders, they are likely to be more aware of and responsive to those needs, and to include the user in the planning and design process.
Nevertheless, even in a small community shop, some amount of standardization can make production quicker, easier, and cheaper. It helps to have a selection of ready-made chairs available when they are needed. That way the person can try different chairs and pick the one that comes closest to meeting her or his needs. Last minute adjustments (or even more substantial changes) can then be made according to the individual's requirements.
Goodness of fit in terms of size, width, seat angle, angle and height of back, need for armrests, position of footrests, etc. is essential. Decisions need to be made with the user, not for her, allowing enough time to test different alternatives and make well-informed decisions.
One of the greatest needs for adjustability in wheelchairs is the width of the seat, and thereby the width of the whole chair. Correct width is important for the stability and comfort of the rider, and for her ease in pushing the chair. A new design for easy adjustment of chair width has been developed, together with a new mechanism for folding the chair.
E. General maintenance tips
- Keep wheelchairs clean by removing dust, mud and sand on a regular basis.
- Oil moving parts, especially the wheel hub and castor wheel.
- Apply oil more frequently in the rainy season.
- If contact with water is unavoidable, wipe the water from all metal parts with a damp cloth after use, then dry the parts as thoroughly as possible.
- Keep all screws, nuts and spokes tightened. Loose parts lead to rattling and disturbance in alignment.
- Get broken or damaged parts repaired or replaced as early as possible.
- If a wheelchair feels unusual to the touch, consult the place which prescribed it or where it was obtained.
- Do not carry excessively heavy loads on a wheelchair.
- Castor wheels have to withstand high loads, especially when obstructions are met. Avoid obstructions if possible.
- Check for smooth movement of castor wheels, as castor pins and brackets may get bent in rough terrain.
- If the chair pulls to one side, the front castor on the side to which the chair pulls may require adjustment. Another cause may be an insufficiently inflated tyre.
- If using inflatable tyres, keep checking the tyre pressure, as low pressure deteriorates braking efficiency.
- Get brake fitting adjusted from time to time.
- Check brake shoes frequently for wear.
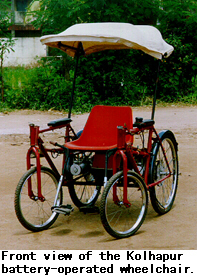
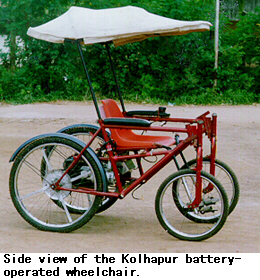
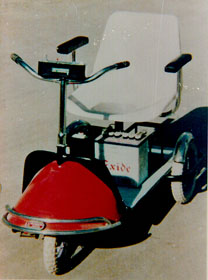
F. Battery-operated wheelchair (*4)
The battery-operated wheelchair is designed for those persons who are able only to use either their right or left hand. A person who has a little movement of the fingers and palm of one hand can also effectively drive this wheelchair on the road. It can also be operated by a person who is unable to use both legs and hands. Such a person can drive the battery-operated wheelchair using her or his chin.
Special Features
- This wheelchair is designed for a person with extensive physical disabilities who can drive the wheelchair on the road.
- If the battery is discharged or if there is any problem with the transmission, then by releasing the transmission belts, the wheelchair can be used as an ordinary, manually operated wheelchair.
- The wheelchair does not have any conventional steering system. By differentiating the speed of the two direct current (D.C.) motors, the wheelchair is steered.
- The wheelchair has an automatic braking system. By reversing the direction of rotation of the driving motors, braking can be achieved. A mechanical brake is also provide as a standby brake.
- The seating arrangement is adjustable. The driver can easily transfer from an in-house wheelchair to this vehicle. The foot-rests are also adjustable.
- The direction of the vehicle is controlled by a four-way mouse (mouse similar to that used with computers). By pressing the mouse with a light touch, the driver can move the vehicle in a forward, right-turn, left-turn or reverse direction.
- The motors are coupled with a reduction gear box. Through relay switches, four different speeds ranging from 10 Kmph to 30 Kmph can be achieved.
- A safety belt is provided.
- The vehicle is perfectly balanced and the centre of gravity (C.G.) of the vehicle is kept as low as possible.
- This vehicle is designed as a prototype. The vehicle is made as light as possible. For this purpose, two bicycle frames are used which are placed parallel to each other. However, further improvement in chassis construction is possible if the wheel chair is to be manufactured on a commercial basis.
Technical specifications
- Physical dimensions:
Wheel base 1090 mm Width 700 mm Overall length 1680 mm Total height 1000 mm Ground clearance 100 mm Weight 110 kg Front wheel diameter 430 mm Rear wheel diameter 580 mm Motor pully diameter 50 mm Wheel pully diameter 120 mm Battery Lead Acid 12 V 13 plate
- Motor specifications
Volt 12, HZ DC Output 15 Ib/ins. Rating 1/2 hour Winding Series parallel RPM 5000 on armature shaft
320 on reduction gearProtection Vent
Background
- Originally, the wheelchair was designed for Dr. Shailendra Joshi, who, as a result of multiple sclerosis, became paralysed. The fingers and palm of his right hand had some movement. Considering the abilities that he retained and his overall physical condition, all the operations of the wheelchair were controlled by the mouse which operates even with a light finger touch.
- The wheelchair was road tested and the performance found satisfactory. It runs for about 45 Km with a single battery charge. It was displayed at the technocrat exhibition at the Indian Institute of Technology-Powai, India, at the time of the International Conference on Management of Technical Education, where it was viewed by technocrats from all over India and abroad.
- This project was developed by the students of the New Polytechnic, Kolhapur, India, under the guidance of Professor Shridhar G. Vaidya, and with assistance from Mr. R.D. Kadam and Mr. Shrikant A. Patil. Since the project had been implemented from a more academic perspective, future modifications for its improvement are possible. Further details may be obtained from:
- Professor Shridhar Govind Vaidya
- 64/1, Vijayshree, Baba Jarag Nagar
KOLHAPUR (M.S.), India. PIN-416 007
Tel: 91-231-621382
Nevedac Battery-operated Wheelchair
Battery-operated wheelchair, with forward/reverse, left/right movements Controlled by a single switch control system, a commercially available battery, pneumatic tyres, arms rests, fibreglass seat, thumb operating controls and a speedomotor, fitted in the handle bar.
Price: Rs. 18,500/ to Rs.22,000/ (approxim., for Chandigarh)
Another Nevedac model is a battery-operated wheelchair with forward/ reverse and side movements controlled by a single switch control system and "in-built" battery, battery charger, left/right movements, manually controlled.
Price: Rs.14,500/ (approxim., for Chandigarh)
G. Ground mobility device (*5)
About the Project
An international collaborative project was initiated to design and manufacture a mobility device for people with disabilities who have difficulties walking indoors and outdoors close to their home.
The two primary participants were the International Centre for the Advancement of Community Based Rehabilitation (CIDA funded), Canada, and the National Institute of Design, Ahmedabad, India.

Why a ground mobility device?
A ground mobility device provides an alternative way for a disabled person to move inside and close to home. Because the seat is close to the ground it eliminates the need to change the environment to a wheelchair height. This design will help the person to:
- Move from one place to another independently;
- Perform activities at ground height (e.g., eating with the family, sweeping, school work, child care, cooking, washing dishes);
- Carry items (e.g., a water bucket, children).
Who can use this device?
People who have difficulties walking:
- People with old or new injuries to their legs (e.g., polio, amputations, spinal cord injuries);
- People with long or short term difficulties;
- Children, adults, or the aged;
- Women or men.
Where to use this device?
- In communities where activities are performed on or close to the ground;
- Indoors and outdoors;
- Urban or rural areas;
- In the home, school, or at work.
How to use this device?
To use the device on her own the person must be able to:
- Sit up;
- Use both arms/hands.
The person must learn how to: (See Figure 1 to 4)
- Lock/unlock the brake (turn the knob);
- Climb on/off (put lock on first).
- Go forwards / Stop or slow down (hold wheels) / Go backwards
- Turn
Making the device
- This is a simple design which can be easily changed to fit the person better.
- Locally available materials should be used whenever possible.
- The costs depend upon local circumstances, material and labour costs and number of devices produced.
General dimensions
| A: Ground clearance | 100 mm |
| B: Castor height | 75 mm |
| C: Seat length | 465 mm |
| D: Backrest angle | 100 degrees |
| E: Large wheel height | 270 mm |
| F: Backrest height | 270 mm |
| G: Seat width (not shown) | 425 to 575 mm |
| H: Maximum width (not shown) | 580 mm appro |
Parts of the Device
Other Options
- A: Push handles.
- B: Back cushion, extra back or side support.
- C: Seat belt.
- D: Seat cushion.
- E: Leg extension.
- F: Larger or smaller seating area (not shown).
Options for Pushing
- Hands on wheels;
- Hands on rim;
- Hands on pegs.
Design with jute or plastic weaving and one castor wheel.
Contacts
For further information on any aspect of this project, or to give suggestions, please contact:
- Vikram Panchal
- National Institute of Design
- (NID), Paldi, Ahmedabad 380 007
- India
- Tel: 079 663 9692
- Fax: 079 663 8465
- Email: nid@adinet.ernet.in
- Tanya Packer or Susan Mulholland
- International Centre for the Advancement of Community
- Based Rehabilitation (ICACBR) Queen's University, Kingston
- Ontario, K7L 3N6, Canada
- Tel: 613 545 6881
- Fax: 613 545 6882
- Email: packert@post.queensu.ca
Acknowledgments
Thank you to V. Panchal, S. Mulholland, J. Lysack, T. Packer, U. Wyss, S. Olney, S. Balaram, and all at NID, ICACBR, and the Blind Men's Association (Ahmedabad) for their contributions to this project.
*1 Source: Handicap International (HI) Cambodia, Bld. Sothearos 53, Phnom Penh; P.O. Box 838, Phnom Penh, Cambodia.
*2 Source: David Werner, Nothing about Us without Us: Developing Innovative Technologies For, By and With Disabled Persons. HealthWrights 1998, pp.176-177. Palo, Alto, California, U.S.A.,
*3 Source: David Werner, Ibid., p. 189.
*4 Source: Information obtained by Mr. Antony Samy, WORTH Trust, India.
*5 Source: Booklet titled Ground Mobility Device, as reproduced here in its entirely .
Go back to the Contents
ECONOMIC AND SOCIAL COMMISSION FOR ASIA AND THE PACIFIC
Production and distribution of assistive devices for people with disabilities: Supplement3
- Chapter 2 -
ST/ESCAP/1774
UNITED NATIONS PUBLICATION
Sales No. E.98.II.F.7
Copyright © United Nations 1997
ISBN: 92-1-119775-9