Disabled Village Children
A guide for community health workers,
rehabilitation workers, and families
PART 3
WORKING IN THE SHOP:
Rehabilitation Aids and Procedures
CHAPTER 63
Walking Aids
In designing aids for a child, we need to think not only about her type and amount of disability, but also the stage of progress she is at. For learning to walk, she may progress through a series of stages and aids. Here is an example:
|
1. Parallel bars |
2. Wheeled walker |
3. Crutches modified to form walker |
||
|
|
|
||
|
4. Underarm crutches |
5. Below elbow crutches |
6. Cane with wide base |
7. Walking stick (cane) |
8. If possible, no aids at all |
|
|
|
|
|
In this chapter we show a variety of aids for walking. Most can be made easily out of tree branches or wood. Some can be made from building construction bars (reinforcing rod) or metal tubing, and may require welding.
We include these ideas not to ask you to copy them, but with the hope that they will 'trigger' your imagination. Take ideas from these designs, and use the materials you have at hand. When possible, make your aids to meet the needs of the individual child.
At a village rehabilitation center, it helps to have a wide selection of aids on hand, so that you can try different ones on a particular child to find out what works and what she likes best.
Parallel bars
Simple designs for outdoor parallel bars, both adjustable and non-adjustable, are included in Chapter 46 on playgrounds, Page 417 and 425. On Page 417 we also give suggestions for adjusting the bar height to meet the needs of the individual child. The designs shown are:
OUTDOOR BARS
|
|
|
|

INDOOR BARS (design details for two of several models)
|
|
|
IRON PIPE BARS
METAL CONDUIT TUBING
|
|
|
Walkers
There are many ways to make walkers or walking frames. Here we show a range from very simple to more complex. Choose the design and height depending on the child's needs and size.
table width="80% cellpadding="5">
|
Julio has strong arms and good body control. He can use a simple low walker. |
Lico has weak elbows and poor balance or body control. He needs a higher walker with armrests. |
Anna has weak legs and poor balance. She does best with underarm crutches built into the walker. |
The above walkers can be made with 2 cm. x 4 cm. boards (such as those used on roofs to hold tiles), or thin trees or branches. The wood or plywood wheels roll easily when little weight is on them (when child pushes walker) but have a braking action when child puts full weight on them (when taking a step).
![]()
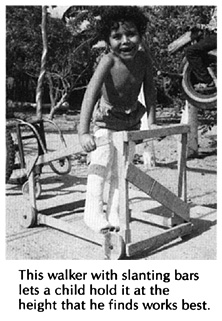
Finding the design that works best for a particular child often involves experimenting and changing different features.
|
For example, Carlota has poor body and hip control, and tends to 'fall through' the space between her arms when the handgrips are upright. |
A higher walker with a bar as the handgrip works better for her. |
|
These walkers can be made out of welded or bolted metal tubing. |
|
Other walker designs
WALKER MADE FROM CANE, RATTAN, OR BAMBOO
Joints can be tied with cane, ribbon, nylon string, strips of car inner tube or whatever.
WOOD WALKER
Wood walker for a child whose legs need to be held apart.
Note: A walker with no wheels is very stable but harder to move. 
A walker with 2 wheels and 2 posts is fairly stable but easy to move. 
A walker with 3 or 4 wheels is very easy to move but can easily roll out from under the child (unless the child is seated). |
WALKER MADE FROM SOLID IRON ROD (RE-BAR) WITH ARMRESTS-WELDING REQUIRED
|
|
|
|
|
||
|
|
|
|
SIMPLE WALKER MADE FROM SOLID IRON ROD (RE-BAR)- WELDING REQUIRED
![]()
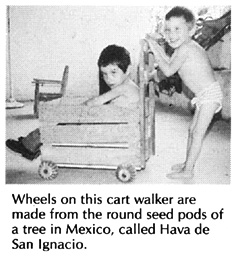
CART WALKERS
The added weight in the cart can help the child stand firmly-and makes learning to walk more fun.
Design from Handling the Young Cerebral Palsied Child at Home, Finnie. (See Page 638.)
As the child progresses, he can change his grip from the front bar to the side bars.
![]()
ROLLER SEAT AND TRICYCLE WALKERS
Useful for a child with cerebral palsy who 'bunny hops' (crawls pulling both legs forward together). Seat holds legs apart. The 'chimney' helps child keep his arms up and apart.
Design from Handling the Young Cerebral Palsied Child at Home, Finnie. (See Page 638.)
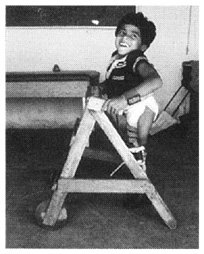
WALKERS FOR SITTING AND STANDING
SPIDER WALKER
Useful for the small child severely affected by cerebral palsy.

![]()
SADDLE-TYPE WALKER
Design from UPKARAN Manual. (See Page 642.)
|
CAUTION: Sitting walkers should usually be used, if at all, as an early and temporary step toward walking. With them, the child does not learn to balance well and the hips are often at an angle which can form contractures (see Chapter 8, Page 86). |
Crutches
MEASUREMENTS FOR UNDERARM CRUTCH
Top of crutch should be 3 fingers' width below armpit, so it does not press under the arms.
Elbow should be bent a little so that arms can lift body when walking.
Handgrip should be placed for comfort- usually about 1/3 of the way down crutch.
WARNING: Bearing weight under the arms like this can cause nerve damage that in time can lead to numbness and even paralysis of the hands.

Teach the child to put weight on her hands, not on her armpits.
One good way to make sure the child does not hang on the crutches with her armpits is to use elbow crutches like this.
There are many designs for underarm crutches. Here we show a few.
CRUTCHES FROM TREE BRANCHES, padded with wild kapok
|
These single support designs using tree branches are not as strong as the double support design shown at left.
|

WOODEN CRUTCHES
METAL CRUTCH
ADJUSTABLE WOOD CRUTCH
LEATHER RING ELBOW CRUTCH
These crutches are easy to make and work well for children who have strong arms and hands.
A disadvantage is that if a child fails he may have trouble getting his arms out quickly.
OTHER ELBOW CRUTCHES
With these open elbow-ring crutches, the child can easily get his arms out if he falls.
|
STANDARD ADJUSTABLE
|
USING LOCAL RESOURCES
|
Gutter crutch ('arthritis crutch')
For children who, due to elbow pain or stiffness, cannot use straight-arm crutches.
|
STANDARD
|
USING LOCAL RESOURCES
|

These are only examples. Once you get the idea, you can invent your own. A lot of experimentation is often needed to adapt crutches for children with severe arthritis.
Crutch for a child with weak elbow-straightening muscles.
Canes and walking sticks

Straight poles can help a child with balance problems.
|
CAUTION: Use poles that are taller than child so if she fails, they will not poke her eyes. |

Canes. Simple canes provide some balance and support, but the child has to use the walking muscles in both legs.
For the child who needs to strengthen a weak or painful leg, a cane makes him use his leg. A crutch lets him avoid using his leg, so the muscles that bend his leg get stronger, rather than the ones that straighten it. (See Page 526.)
|
CANES CUT FROM FOREST PLANTS
|
ADJUSTABLE METAL TUBE CANE
|
3 OR 4 FOOTED CANE - FOR GREATER STABILITY
|
|
|
|
Rubber tip made from car tire for metal tube or bamboo crutch or cane
For walking in sandy places make crutch and cane tips extra wide.
Adaptations of walking aids for carrying things and for work
CRUTCH SLING to free hands for work
LEATHER OR CLOTH POUCH
BACKPACK
HOE ADAPTED AS CRUTCH
Disabled Village Children
A guide for community health workers,
rehabilitation workers, and families
by David Werner
Published by
The Hesperian Foundation
P.O. Box 11577
Berkeley, CA 94712-2577