Disabled Village Children
A guide for community health workers,
rehabilitation workers, and families
PART 1
WORKING WITH THE CHILD AND FAMILY:
Information on different Disabilities
A. Where Do We Start?
CHAPTER 5
Simple Ways to Measure and Record a Child's Progress
It is important to keep records of each child's progress. Careful records help workers and parents to follow the change in the individual child, and to evaluate the effectiveness of advice, therapy, and aids.
We need a clear view of the progress of the whole child in all areas - physical, mental, and social. The Child Development Chart on Page 292 and 293 will help us to do this for younger children. For children over 5, at the end of this chapter there is a simple chart (RECORD SHEET 5) for evaluating a child's increasing ability to do things.
When the parents and child themselves regularly measure and record a child's progress, they become more aware of gradual improvements. This encourages them to continue with important exercises, aids, and activities. Unfortunately, the standard way of recording physical deformities and contractures requires knowledge of angles, degrees, and symbols that many people do not understand. For evaluation to become a family tool, we need a way to measure, record, and interpret information that is as simple, clear, and enjoyable as possible. Here are some ideas.
MEASURING JOINT POSITIONS AND CONTRACTURES
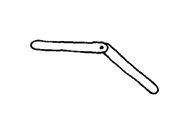
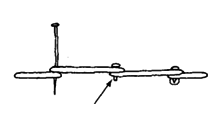
You can make a simple measuring tool using 2 flat pieces of wood, plastic, or cardboard. (Tongue depressors work well.)
Other simple methods for recording joint positions are on Page 79.
|
1. Rivet the pieces together on one end. |
2. Line them up exactly with the joint. |
|
3. Trace the angle on paper. |
4. Do this again every 1 or 2 weeks to see if the joint is straightening with exercise. |

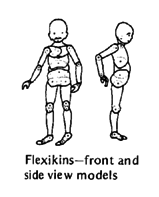
The 'flexikin'- an aid to measure and encourage progress
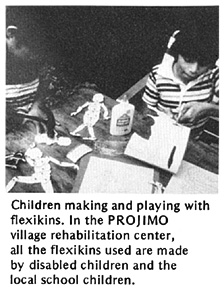
Flexikins are cardboard dolls with joints. Disabled and non-disabled children can make and play with them. They are so easy to use that even parents who cannot read can measure and record their children's contractures. Because the periodic measurements are recorded as a line of pictures, anyone can see the child's progress at a glance.
We have found that when families follow their child's progress using flexikins, both the child and parents are more likely to keep doing stretching exercises. As a result, many contractures can be partly or completely straightened in the home, and there is less need for casting and surgery.
Examples of how flexikins are used
|
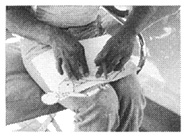
Village rehabilitation workers have just made a brace for a child with polio whose leg bends back severely. They want to know if the leg will gradually get better (bend back less). So they ask the mother to measure it every month. |
|
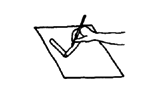
The mother places the flexikin's leg in the same position as her son's leg, bent back as far as it goes. She then traces it onto a large sheet of paper.
|
|
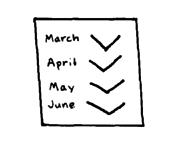
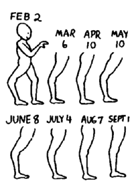
Each month she does the same and records the date. (in April her son did not use the brace for 2 weeks and she saw the knee was getting worse. This convinced both mother and boy of the importance of using the brace.) |
The flexikins can be used to record a wide variety of positions, deformities, contractures, and limitations in range of motion, mainly of the arms and legs but also of the neck, back, hips, and body:

In addition to using the small flexikins for record keeping, you can make large flexikins for group teaching. Or use them to keep body proportions correct when making drawings for instruction sheets.
|
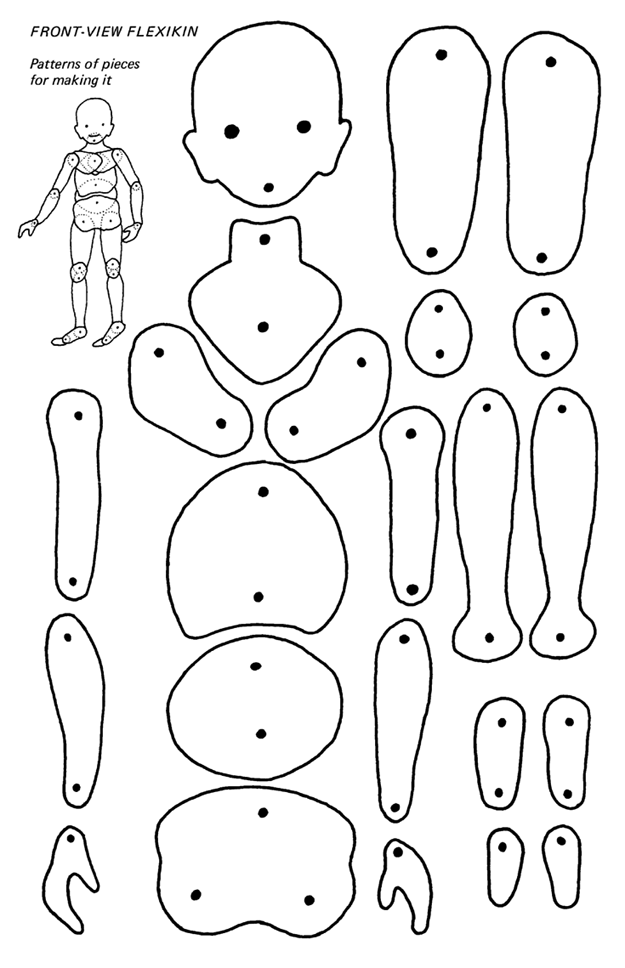
Note: For recording contractures, we have found the side-view flexikin more useful than the front-view one. The side-view flexikin is also easier to make. It is probably the only one you will need for evaluating a child's progress. |
How to make the flexikins
1. Trace the patterns of different pieces (Page 47 and 48) onto very thick paper or thin, firm cardboard. Or use old X-ray film.
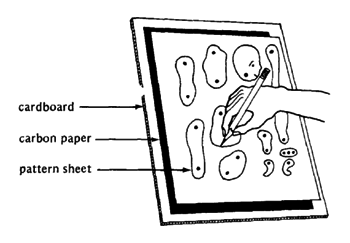
You can do this using carbon paper. (Make your own carbon paper by completely blackening a sheet of paper with a soft-leaded pencil.)
Or you can glue a copy of the pattern sheet directly GLUE to the cardboard.
(If your program plans to make many flexikins, or have children make them, we suggest you have the patterns printed or mimeographed directly on sheets of thin, firm cardboard.)
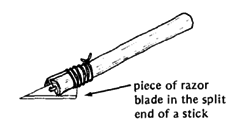
2. Cut out the pieces with strong scissors, shears, or a piece of razor blade.
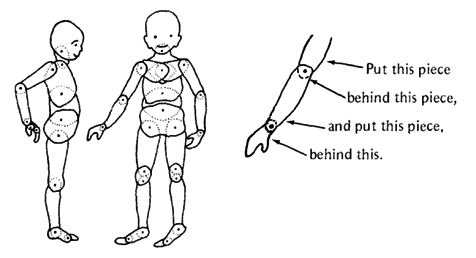
3. Place the pieces together as shown in the drawings. Make sure the pieces that overlap with dotted lines go behind those with complete lines.
4. Fasten the pieces together at the black dots with rivets, pins or thread.
|
Use the smallest rivets you can find. 
|
Or string the joints together with thread or yarn (this does not work as well). 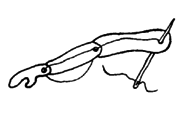
|
|
Or use thin wire or string and tie knots. 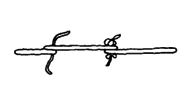
|
Or use sewing pins; cut here and put a drop of very strong glue (like epoxy) here. |
Rivets usually work best. First punch a hole through each black dot. Put the rivets through and hammer them just enough so that the cardboard joints are tight enough to hold their positions but can be moved without tearing.
You can copy this sheet, or one like it, and give it to parents together with a flexikin. Be sure that you also show them how to use it and then watch them use it.
|
INSTRUCTIONS FOR USING THE FLEXIKIN We have given you a 'flexikin' so that you can measure and see the progress that your child is making with his exercises or aids. We suggest you take a new measurement every ____________________. 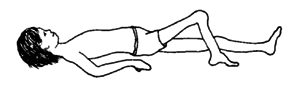
1. Have your child take the position you want to measure (for example, straighten his knee as much as he can). 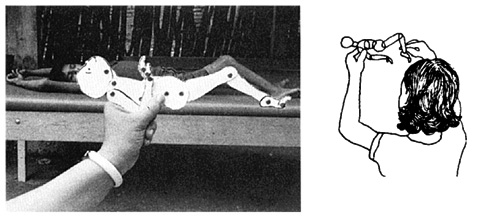
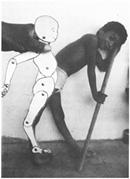
2. Put the flexikin in exactly the position the child is in. To do this hold the flexikin at a distance between your eye and the child so that it appears the same size as the child. This will let you line it up exactly. 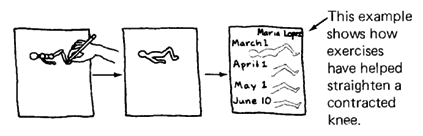
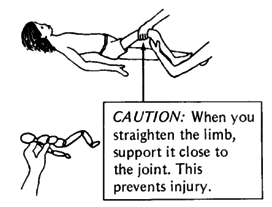
3. Without moving the position of the flexikin, trace it onto a large piece of paper. The first time trace the whole body. Each time measure the child in the same posture. For later recordings, you only need to trace the part or parts you are measuring. Each time you record a measurement, write the date. In certain cases you may want to measure how far the child can straighten an arm or leg by herself, and how far you are able to straighten it for her (little by little without forcing).
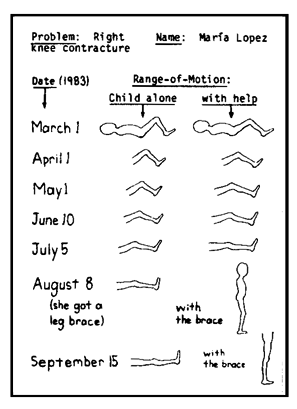
Make 2 columns. In one, record how far the child can move it by herself. In the other column record how far she can move it with help. Here you see the progress of a leg until it became straight and a brace could be made for it. |

EVALUATING THE PROGRESS OF THE WHOLE CHILD
A simple way for rehabilitation workers and parents to evaluate how a child is progressing as a whole is to keep a record of her ability to do different things. Each month, or during each visit to the community rehabilitation center, the child's different abilities are reviewed, tested, or observed. Any changes are recorded.
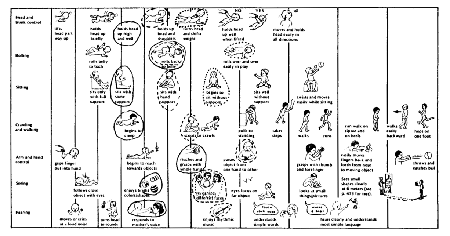
For children under 5 years old, one way of evaluating a child's development is to use the RECORD SHEET 6 (Page 292). This chart shows the developmental levels ('milestones') for different skills and activities. The first time the child is evaluated, circle the drawing that shows what the child can do in each area.
Each time the child is evaluated, on the same sheet, again circle the appropriate drawing, but use a different color (or a dotted, dashed, or zigzag line). This way, you can see where the child is moving ahead well and where he is behind.
For evaluating the progress of children over age 5, the charts on the next page may help. Two different approaches are used. Chart A is more objective (requires less personal judgment or opinion) but does not allow for small improvements. Chart B is more subjective (is based more on personal judgments). It considers quality of improvement, not just quantity. You can try both and see which you think gives truer, more useful results.
To use Chart A: For each skill, circle whether the child can do it "without help," "with a little help," Add all the numbers you circle. Compare the scores of the first and second visits. For example:
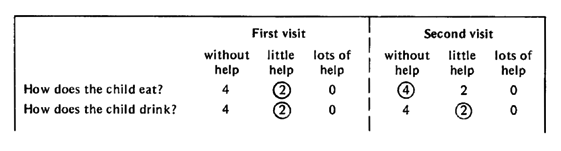
Here we see the child has improved his eating skills but not his drinking skills.
To use Chart B: In each area, on the second visit, circle whether the child is doing a lot better, a little better, or the same. Add it all up. The higher the score, the more the child has improved.
|
NOTE: We question whether the use of numbers may not be misleading. But we think the questions themselves may be a useful guideline. None of these evaluation forms will show all areas of change or improvement. They are not substitutes for detailed notes, drawings, and a good memory! |

EVALUATION OF PROGRESS - CHILD OVER AGE 5
Name ____________________ Age________ Disability ____________
| CHART A | First visit (date______ ) | Second visit (date______) | ||||
| Daily activities | without help | little help | lots of help | without help | little help | lots of help |
| Feeding | ||||||
| 1 . How does the child eat? | 4 | 2 | 0 | 4 | 2 | 0 |
| 2. How does the child drink? | 4 | 2 | 0 | 4 | 2 | 0 |
| Dressing and washing | ||||||
| 3. Does child wash face and body? | 4 | 2 | 0 | 4 | 2 | 0 |
| 4. Does child dress? | 4 | 2 | 0 | 4 | 2 | 0 |
| 5. Does child put on orthopedic equipment? | 4 | 2 | 0 | 4 | 2 | 0 |
| Bowel and bladder care and control | ||||||
| 6. Does child stay clean (bowel control)? | 4 | 2 | 0 | 4 | 2 | 0 |
| 7. Does child clean herself after shitting? | 4 | 2 | 0 | 4 | 2 | 0 |
|
8. Does child stay dry during the day? |
4 | 2 | 0 | 4 | 2 | 0 |
| 9. Does child stay dry at night? | 4 | 2 | 0 | 4 | 2 | 0 |
| Mobility/transfers | ||||||
| 10. Does child move from chair to bed and back? | 4 | 2 | 0 | 4 | 2 | 0 |
| 11. Does child move from floor to bed and back? | 4 | 2 | 0 | 4 | 2 | 0 |
| Movement | ||||||
| 12. Walks on flat surface? | 4 | 2 | 0 | 4 | 2 | 0 |
| 13. Walks on uneven surface? | 4 | 2 | 0 | 4 | 2 | 0 |
| 14. Climbs up and down stairs? | 4 | 2 | 0 | 4 | 2 | 0 |
| 15. Uses a wheelboard or wheelchair? | 4 | 2 | 0 | 4 | 2 | 0 |
| 16. Does child crawl? | 4 | 2 | 0 | 4 | 2 | 0 |
| Social activities/communication | ||||||
| 17. Does child help with housework or farm work? | 4 | 2 | 0 | 4 | 2 | 0 |
| 18. Does child play with other children? | 4 | 2 | 0 | 4 | 2 | 0 |
| 19. Does child go to school? | 4 | 2 | 0 | 4 | 2 | 0 |
| 20. Does child speak? | 4 | 2 | 0 | 4 | 2 | 0 |
| 21. Does child communicate with signs or gestures? | 4 | 2 | 0 | 4 | 2 | 0 |
| Total ________ | Total ________ | |||||
| CHART B | First visit | Second visit | |||
| Quality of activities | make notes for comparison here | much better | a little better | same | worse |
| Does child move about better? | 4 | 2 | 0 | -4 | |
| Does he sit in a better position? | 4 | 2 | 0 | -4 | |
| Does he walk better (straighter, with less limp, or with less support)? | 4 | 2 | 0 | -4 | |
| Does he walk farther, faster, or easier? | 4 | 2 | 0 | -4 | |
| Are his joints straighter (less contractures)? | 4 | 2 | 0 | -4 | |
|
4 | 2 | 0 | -4 | |
|
4 | 2 | 0 | -4 | |
|
4 | 2 | 0 | -4 | |
| Can the child do things he could not do before? | 4 | 2 | 0 | -4 | |
|
4 | 2 | 0 | -4 | |
|
4 | 2 | 0 | -4 | |
|
4 | 2 | 0 | -4 | |
|
4 | 2 | 0 | -4 | |
| Does he play with things better? | 4 | 2 | 0 | -4 | |
| Does he speak or communicate better? | 4 | 2 | 0 | -4 | |
| Does he get along with other children better? | 4 | 2 | 0 | -4 | |
| Does he seem happier or more self-confident? | 20 | 8 | 0 | -4 | |
| Has he improved or got worse in other ways? | 4 | 2 | 0 | -4 | |
|
4 | 2 | 0 | -4 | |
| Total ________ | |||||
Disabled Village Children
A guide for community health workers,
rehabilitation workers, and families
by David Werner
Published by
The Hesperian Foundation
P.O. Box 11577
Berkeley, CA 94712-2577