Disabled Village Children
A guide for community health workers,
rehabilitation workers, and families
PART 3
WORKING IN THE SHOP:
Rehabilitation Aids and Procedures
CHAPTER 67
Artificial Legs
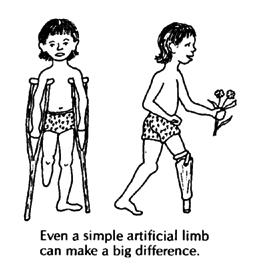
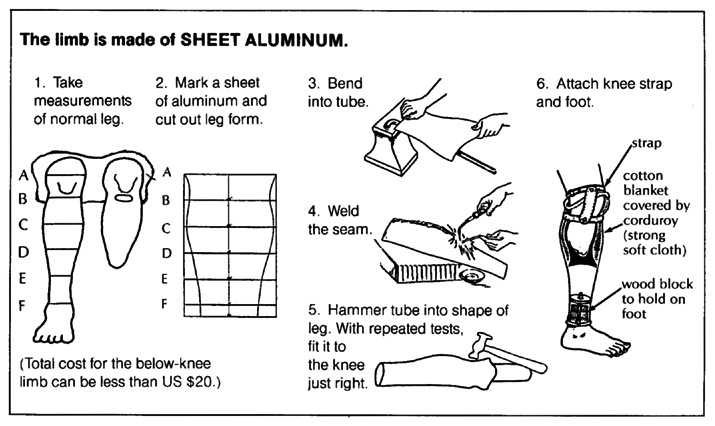
Artificial legs can be (and often are) made at home or in village shops. How well they work and how natural they look depend on many things, including costs, skills, and materials available.
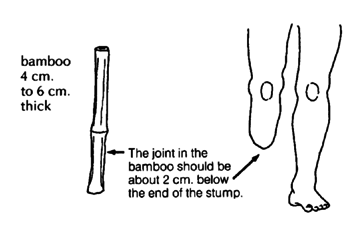
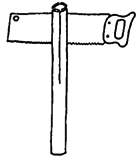
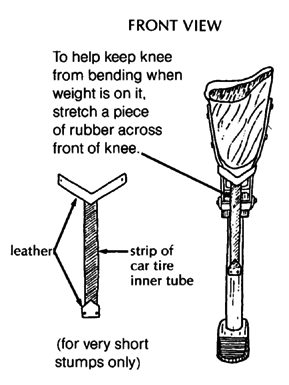
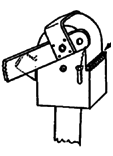
BELOW THE KNEE
The most common leg amputation is below the knee. A leg that has been amputated halfway between the knee and ankle works best for walking with an artificial limb. Here are some examples of artificial limbs, from simple to more complex.
|
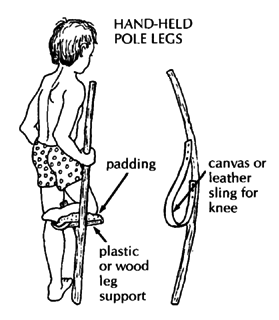
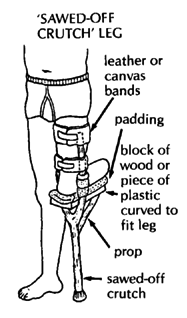
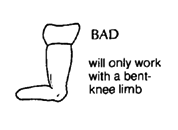
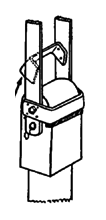
WITH THE KNEE BENT
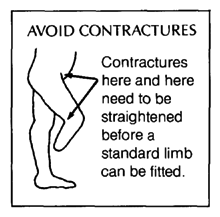
CAUTION: Limbs like these 3 are quick and easy to make, but they cause knee contractures. As a result, the knee cannot be easily straightened to fit a better, more useful limb. Bent-knee limbs should only be for temporary or emergency use. Do exercises every day to keep the knee straight and strong. (See Page 229 and 230.) |
|
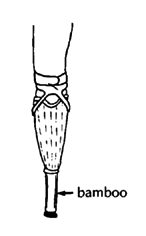
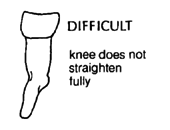
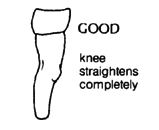
WITH THE KNEE STRAIGHT |
|
|
BAMBOO AND PLASTER LEG
|
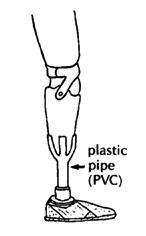
PLASTIC PIPE LEG WITH FOOT
|
|
These limbs are better because the knee has full range of motion. Walking is easier and more natural. However, the person's weight must be supported evenly over the entire stump, not only at the end of the stump. (See Page 631.) |
|
|
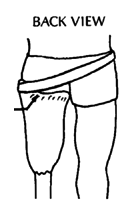
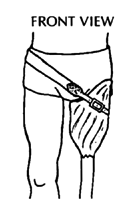
Positions for FITTING A LIMB
|
Exercises to strengthen and straighten the leg
From the time a leg has been amputated until a limb is fitted, daily exercises are needed to keep the hip and knee muscles strong and to avoid contractures. If weakness and contractures already exist, these should be corrected as much as possible before a limb is fitted. Exercises are discussed on Page 229 and 230.
How soon can an artificial limb be fitted?
Children born without a foot or part of a leg (or legs) can be fitted with an artificial limb as early as 10 or 12 months of age.
A child whose foot has been cut off can and should be fitted with a temporary limb as soon as the wound has healed. However, be very careful not to injure or put any pressure on the new scars or end of the stump.
Note: On a very young or fat child, it may be difficult to fasten the limb firmly to the knee (the bones may not stick out enough). Straps to a waistband and even over the shoulder may be needed. |
Temporary limbs-when to use them and why
Because a stump usually shrinks and changes shape in the first weeks after a limb is fitted, it is often wise first to tit a low-cost, temporary limb. This is especially true if the amputation is new or the stump is swollen. A better-looking, more permanent limb can be made after 4 to 6 weeks, or when swelling is gone.
Preparing the stump
In the first weeks or months after an amputation, the stump tends to swell up. The swelling may in time lead to a club-shaped, deformed stump, which is difficult to fit with an artificial limb. For this reason, it is important to wrap the stump with elastic bandage from the time the leg is cut off until a limb is fitted, or at least until there is no more sign of swelling. Instructions for wrapping the stump are on Page 228.

NOTE: When the person is not wearing the artificial leg, he should also wear an elastic bandage to control the stump shape.
The art of limb making
Making artificial limbs that fit and work well is both a science and an art. If possible, try to learn from a skilled limb maker. 'On-the-job' training for even a few days can make a big difference.
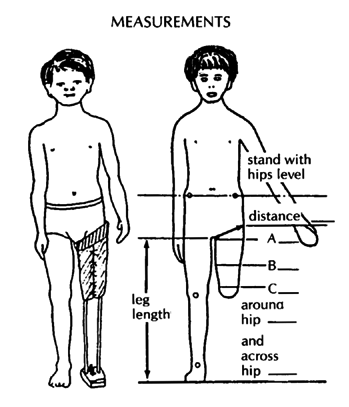
Before starting to make an artificial limb, STUDY THE PERSON'S LEG
A good fit of the socket on the stump and at the knee is one of the most important - and difficult - parts of limb making. It helps to have an understanding of the bones and muscles in the leg.
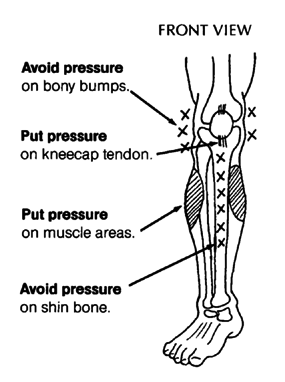
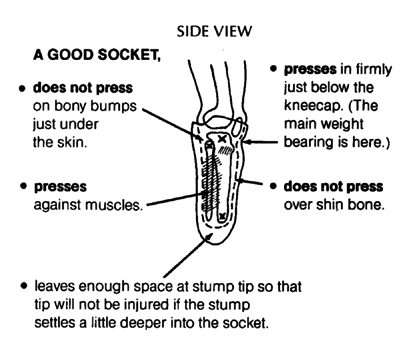
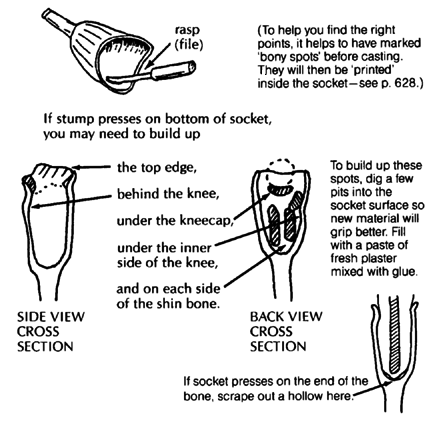
Before beginning, study the person's knee and stump carefully. Note the positions of the kneecap, the bony bumps on the sides of the knee, and the shin bone.
|
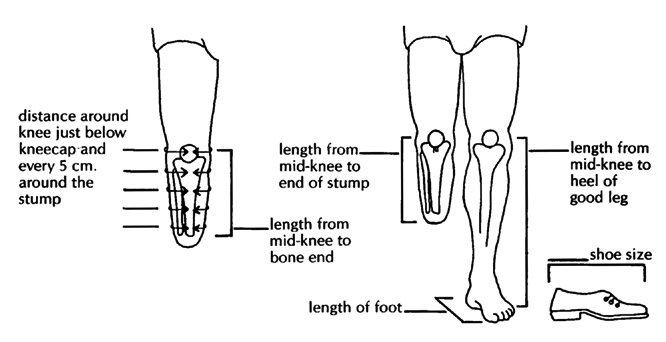
MEASUREMENTS YOU MAY NEED FOR A BELOW-KNEE LIMB
Note: For the plaster and bamboo limb, only lengthwise measurements are needed. Note: The artificial limb should be the same length or just a little shorter than the other leg. |
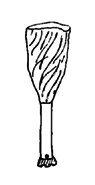
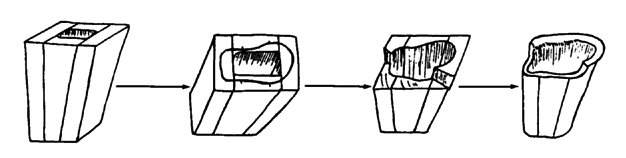
PLASTER AND BAMBOO BELOW-KNEE ARTIFICIAL LEG
This simple, low-cost leg was developed for refugee amputees in Thailand by Operation Handicap Internationale. It is most useful as a temporary limb for learning to walk. However, if the inner (plaster) part of the socket is made with waterproof glue, or is protected from getting wet, the leg can last for a long time.
Steps for making the plaster socket
1. Make a thick 'cup' or 'cap' of sponge or folded cloth and tape it over the end of the stump (to give it a little extra length).
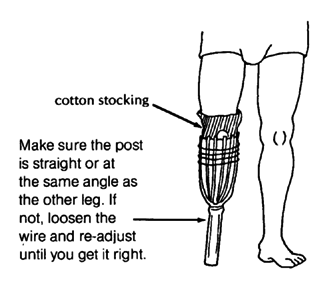
2. Put a thick, tight-fitting stocking -without seams if possible-over the stump and knee. (Several thin layers of stocking can be used instead of a thick one.)
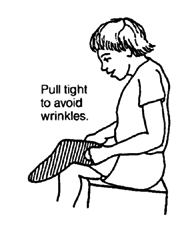
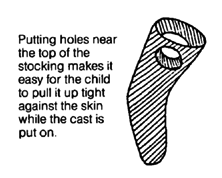
3. Put a thin plastic bag over the stocking.
4. Put a thin cotton stocking or stockinette over the plastic bag and also pull tight to avoid wrinkles.
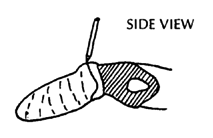
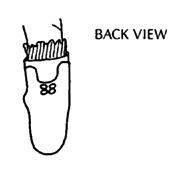
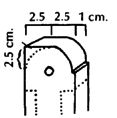
5. With the stocking stretched tight, mark the important places with a 'grease pencil'. The pencil marks will 'print' onto the inside of the plaster cast when it is removed.
Mark all these places:
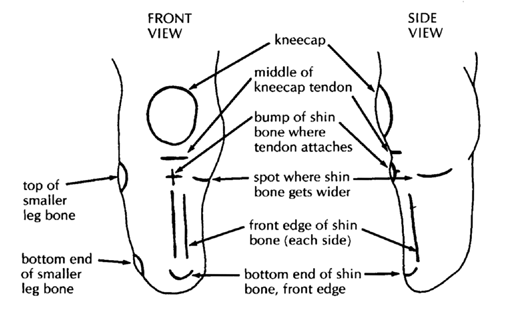
|
Note: If you do not have a stocking, you can mold the socket directly on the stump. Shave any hair off the stump and cover it with vegetable oil (for example, coconut or palm oil). |
6. Wrap the stump and knee with plaster bandage. Be very careful to put the bandage on evenly and smoothly. (Elastic plaster bandage works best, but is very costly. To reduce costs you can make your own plaster bandages for casting. See Page 569).
|
MAKING THE PLASTER WATER-RESISTANT The plaster cast of the stump will become the inner layer of the socket of the bamboo limb. So it should be strong and waterproof. To make the cast stronger and water-resistant, wet the plaster bandage with glue instead of water. 
Use a water-base glue that is water-resistant when it dries. Note: If the plaster cast is to be used only as a mold for making a leather or resin socket, use water, not glue. |
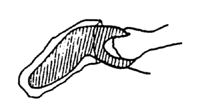
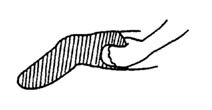
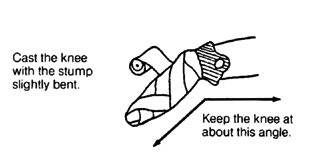
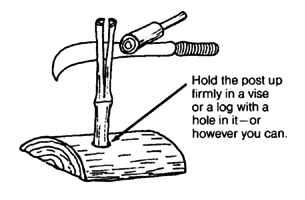
7. As the plaster dries, hold the stump firmly below the knee.

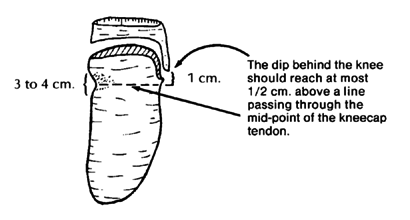
8. When the cast becomes hard, mark where to cut the top edge (see below).
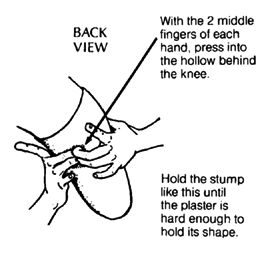
9. To remove the cast, roll the stocking over it. Put your hands over the pressure points (as shown above). Have the child wiggle the stump as you gently pull off the cast.
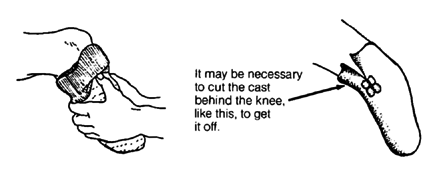
10. Cut the cast along the line you drew.
Preparing the bamboo post
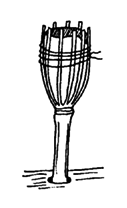
1. Select a piece of strong, green bamboo a little longer than the good leg from the knee to heel.
2. Split the bamboo to a little below the level of the stump end. Split into thin strips-each about 3/4 cm. wide.
3. Remove the softer inner layer from each of the thin strips.
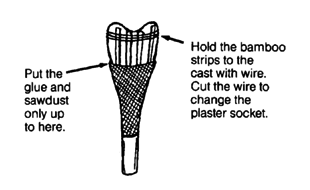
4. Spread the bamboo strips around the plaster socket.
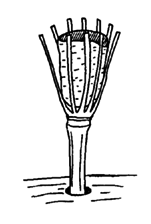
5. Position the socket as correctly as you can. Then with a thin wire, wrap the bamboo tightly against the socket.
6. Put the limb on the stump and have the child stand on it. Check the length. If necessary, cut some off the post.
Note: If child uses a shoe or sandal, be sure to have her wear it when measuring the height of the limb.
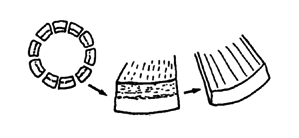
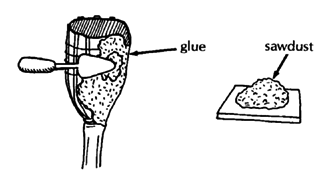
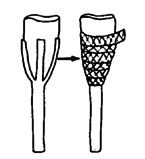
7. After trimming the tops of the bamboo strips, cover the outside of the socket with several layers of glue, sawdust, and gauze bandage:
- Brush on one layer of glue.
- Press sawdust on the glue (with gloves).
- Wrap tightly with gauze bandage. Let it dry
- Repeat 5 or 6 times.
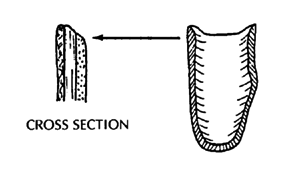
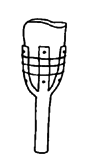
8. Smooth the outside of the socket with sandpaper. Also smooth and round the inner edges at the top.
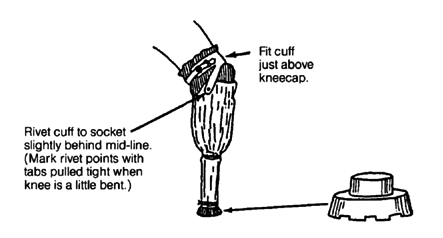
9. Make a 'cuff' to hold the limb on. (if attached correctly, it should also help keep the knee from over-straightening.)
10. Make a rubber 'heel' - a piece of thick truck tire works well. If you can, cut the tire so that a 'plug' fits inside the bamboo. Cut off bamboo as much as the heel is thick. (Be sure to allow for height of sandal or shoe on other foot.)
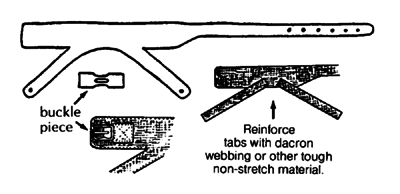
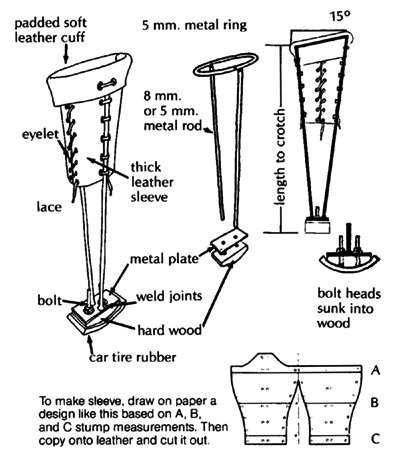
Design for the knee cuff Use strong leather and line it on inside with soft smooth leather. It should be a few cm. longer than the distance around the knee. Glue layers of leather and webbing together with rubber cement and sew at edges. (For other ways of holding the limb to the stump, see Page 626.) |
11. Have the child stand and walk on the limb for several minutes. Then remove it and look for sore spots on the child's skin, or signs of too much pressure. Check especially over bony spots. An area that looks pale when the limb is removed and then turns red or dark, is a sign of too much pressure.

12. Scrape shallow pits into the socket from the inside, at the points where it presses over bones. You may also need to build up around the area where pressure occurs.
|
During the first few weeks of using an artificial limb, the stump becomes smaller, and several changes in limb size may be needed. To save time, use a shorter bamboo post so that the plaster socket can be replaced several times with new, smaller ones.
|
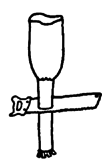
Artificial leg using PVC plastic pipe instead of bamboo
Where plastic PVC water pipe is available, it can be used instead of bamboo. Use a 3 cm. (1¼ inch) thick-walled PVC.
1. Measure the tube the same as bamboo, and cut it to form 4 strips.
2. Heat the PVC in an oven until it gets a little soft.

3. Fit the hot PCV around the socket piece and wrap it tightly with a long strip of cloth or rubber until it cools.
4. Fasten PVC firmly to socket with wire or rivets (or both). It is best to attach it temporarily with wire and to have the child try it before you fix it permanently.
5. Cover with sawdust and glue, or with resin-base casting bandage (very expensive) or with fiberglass and resin (also expensive).
Note: For a stronger, water-resistant limb, the socket can also be made with resin-based casting bandage. But this is also expensive.
|
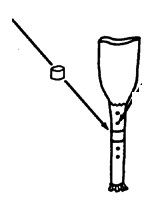
Adjusting the PVC leg 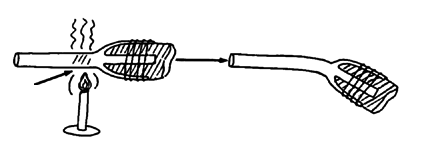
After the child tries on the leg, if the angle seems wrong, you can gently heat the PVC near the stump, |
|
Lengthening the PVC leg to allow for growth of the child
1. Cut through PVC pipe.
2. Cut a strong hardwood rod or plastic tube that just fits inside the PVC.
3. Cut a ring of PVC pipe as long as the additional leg length needed. (Make it a little extra long to allow for more growth.) 4. Put the wood rod inside the PVC with the new ring of PVC. 5. Drill holes and screw or bolt leg together tightly.
6. When an even longer limb is needed, replace the short ring with a longer one.
7. If necessary, to make the joint stronger, cut a piece of PVC lengthwise, heat it, put it over the leg tube, and attach it tightly. |

IMPORTANT: For both below-knee and above-knee limbs, try to line up the limb as well as possible so that its angle is similar to the other leg and 'feels right' when the child stands and steps. Often this requires repeated tries and adjustments. Getting the limb to line up right is the key to successful limb fitting. It helps to learn this from someone skilled at fitting limbs.
ABOVE-KNEE ARTIFICIAL LIMBS
Children who are growing quickly need a low-cost limb that can be easily replaced or lengthened. Small children usually learn to walk well with a straight leg limb that does not have a knee joint.
1. A bamboo or PVC plastic tube above-knee limb can be made in much the same way as for the below-knee limb.
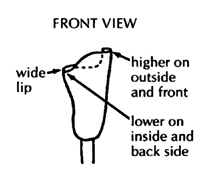
The top edge of the socket should be rounded to form a wide lip on the back, where the butt can sit. Weight bearing should be on the butt bone and over the entire stump-and not just on the end of the stump.
Note: In some countries, thin plastic cuffs the right shape for socket tops can be purchased in different sizes from orthopedic suppliers. They can be placed around the leg before casting and can be re-used. Ask for 'prefabricated ishial weight-bearing cuffs'. |
|
Best shape for top of socket:
|

2. A leather and metal rod limb (adapted from Simple Orthopaedic Aids, see Page 642).
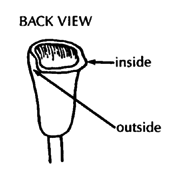
Note: The socket is open at the bottom of the stump. This makes it cooler than the one above, and also allows for growth.
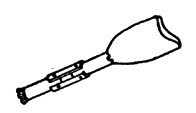
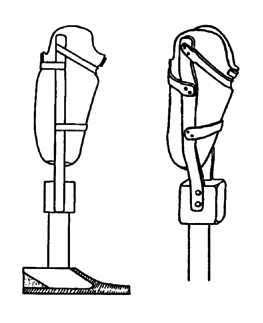
Above-knee limb with knee joint (for older children and adults)
Adapted from the OHI Manual: Simple Above-knee Prosthesis Manufacture. (Write for the complete manual. For address, see Page 642.)
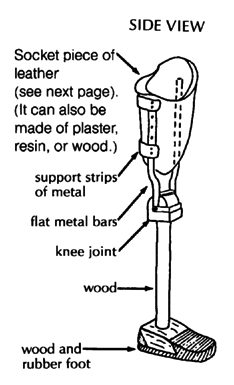
See next Page.
|
Note: This is a simple design for a knee joint. Knee joints that work well are hard to make and you may need to experiment a lot. Perhaps you can re-use a joint from an old limb that is not being used. |
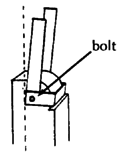
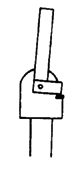
Making the knee joint
|
1. Mark and round the top of the post. |
2. Drill hole at exact center of circle. |
3. Weld or rivet angle piece at right angle. (Use flat metal bar.) |
4. Round back of post. |
5. Drill hole in post and attach bolt with wire (to lock knee straight, when necessary). 6. Ledge prevents knee from bending backward. Small strip of car tire acts as cushion. |
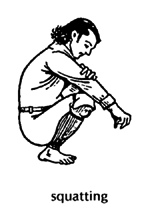
7. Add an angled piece to allow joint to stop in a squatting position. |

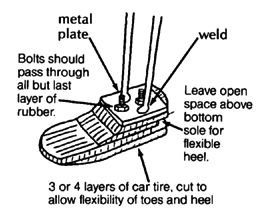
FEET
Putting feet on artificial legs makes them look better (with shoes, sandals, or boots). Also, the wide base helps prevent the leg from sinking into mud or sand. A well-made, flexible foot can make walking easier. Here are 2 possibilities.
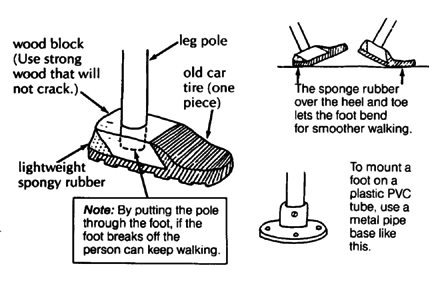
A foot can also be made for a metal-rod leg. Here is one possibility.
OTHER WAYS OF MAKING ARTIFICIAL LIMBS
Wooden legs
The oldest, traditional way of making artificial limbs is to make the socket out of wood.
This is best learned from a skilled craftsperson. Unfortunately, this is a skill that is difficult to learn from a book. A book that describes the method step-by-step is Manual of Above-Knee Wood Socket Prosthetics by Miles Anderson, John Bray, and Charles Hennesey. It has gone out of print, but you may still be able to find it. Unfortunately, the methods described are complex and require a lot of special equipment. However, perhaps they could be simplified. (We have not tried this method.)
Leather socket: Self-adjusting prosthesis
This method uses flat metal bars, a wood post, and a thick, firm leather socket. To form the socket, wet leather is stretched over a plaster mold of the stump. Methods are clearly and simply described in Simple Below-knee Prosthesis Manufacture. (See reference, Page 642.)
A leather socket has several advantages. Leather is available almost everywhere, is more comfortable in hot weather, and can easily be adjusted to the stump as it becomes smaller. Also, leather is soft and easily takes the shape of the stump, and therefore self-corrects molding mistakes.
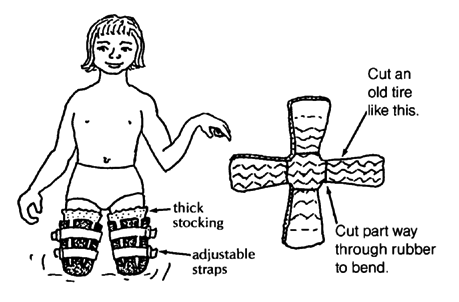
Stump protectors from old tires
For a child with both legs amputated above the knee, short artificial limbs or even simple 'stump protectors' may allow her to move about easier than long leg limbs.
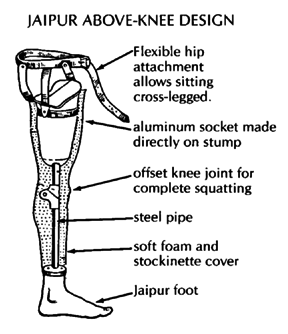
Jaipur limb
The 'Jaipur limb' was developed in Jaipur, India to meet the need for a limb that would (1) allow working 'barefoot' in rice paddies, (2) look like a real bare foot, (3) bend at the foot in all directions enough so the person can squat easily and walk firmly on uneven ground, and (4) be low cost and quick to make.
The foot is made of wood and sponge rubber and then 'vulcanized' (heat molded) with rubber, using a metal mold. The rubber gives the foot its life-like form and color and makes it strong and waterproof.
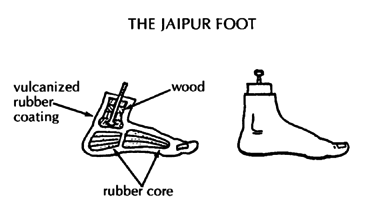
To make the Jaipur limb requires a lot of skill as well as special equipment. But once a shop is set up and persons trained, the limb can be made at very low cost, and fitted very quickly (one hour from the first measurements until the person walks away on his new limb). For instructions, contact Rehab Centre, SMS Medical College, Jaipur 302004, India.
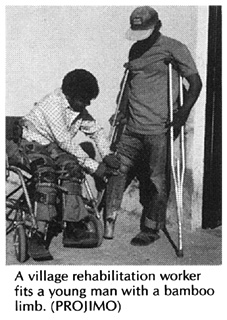
Ideas for a limb-making shop. On Page 521 there is a description of the OHI prosthetics shop in Thailand, where amputee workers make the bamboo and above-knee adjustable limbs shown in this chapter.
Disabled Village Children
A guide for community health workers,
rehabilitation workers, and families
by David Werner
Published by
The Hesperian Foundation
P.O. Box 11577
Berkeley, CA 94712-2577