Disabled Village Children
A guide for community health workers,
rehabilitation workers, and families
PART 3
WORKING IN THE SHOP:
Rehabilitation Aids and Procedures
CHAPTER 60
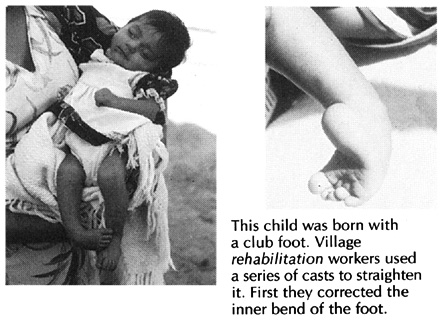
Correcting Club Feet
|
Note: In Chapter 11 we discussed club feet. We suggest you read pages 114 and 116 before trying to correct a club foot. |
The younger a child is when you begin, the more easily and quickly her foot can be straightened. For best results, begin 2 days after the baby is born. If the child is over 1 year old, usually a good correction is only possible with surgery. Ways to predict how easy or difficult correction may be for a particular child are listed on Page 116.
Method 1: STRAPPING
This method works well in a baby with mild to moderate clubbing, especially when the foot can be put into a nearly normal position. The method is easier and cheaper than casting, and sometimes gives better results. You will need:
- tincture of benzoin (to paint on the skin to help the adhesive felt stick firmly. Zinc oxide in the tincture will help protect the skin.)
- cotton wool
- adhesive surgical felt (padding) 8 mm. thick and at least 2.5 cm (1 inch) wide
- adhesive tape (sticking plaster) or zinc oxide strapping 2.5 cm. wide
1. Paint tincture of benzoin on the skin areas to be covered by the tape.
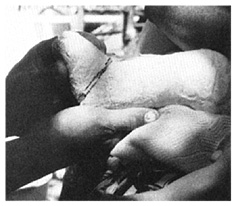
2. Hold the baby's foot like this and gently straighten it as far as you can without forcing.
3. With the knee bent as far as possible, stick strips of felt around the foot and over the knee and leg as shown.
4. Stretch adhesive tape over the felt. Start on the outer side of the foot, go around the foot, up over the knee, and down the other side. Use the tape to pull the toot into a better position.
5. Put a second piece of tape around the leg twice here to hold the first tape.
|
CAUTION: 10 minutes after putting on the tape, check to see if any part of the foot has turned dark. If so, look for the trouble spot and try to adjust the strapping. If it stays dark, take everything off and start again. |
Every 2 or 3 days, tighten the correction by stretching new tape over the old, in the same way. On the 7th day, remove everything and leave the leg free until the next day. On the 8th day, apply new felt and tape.
Exercises during strapping
While the baby's foot is strapped, someone in the family should do stretching exercises on his foot every time he is fed or changed (at least 8 times a day).
|
1. Hold the baby's leg like this and turn his whole foot UP and OUT. Hold and count to 10. Repeat 10 times.
|
2. Turn it as if you were trying to touch the little toe to the outer side of the knee. The strapping and exercises should be continued until the foot is overcorrected (bends outward a little).
|
|
3. If the foot is shaped like a bean, also do an exercise to stretch the foot in the opposite direction of the deformity, like this.
|
4. After stretching the baby's foot this way, help the baby to stretch it himself by tickling the outer edge of his foot.
|
If the foot is not straightened completely within about 3 months of strapping and exercises, surgery is probably needed.
Method 2: PLASTER CASTS
This method uses a casting technique similar to the one for correcting contractures (see Chapter 59). A club foot is gradually straightened in 3 stages:
Stage A
Straighten the inward bend so that the foot points down. Do not yet begin to lift the foot.
Stage B
Overcorrect so that the foot points down and out. Keep the foot in this position until the heel no longer turns in but is straight or turns out just a little.
Stage C
Now bring the foot up, making sure that the outside of the foot is higher than the inside. Overcorrect.
|
Stage A 1. In a young baby it is often necessary to cast the whole leg with the knee bent to keep the cast from slipping down. First, wrap cotton padding evenly around the whole leg.
see Page 560 |
|
2. Cast the leg and foot. Make the cast especially thick around the knee and heel, where he is more likely to bump it.
|
|
3. After the plaster is dry, cut out a wide ring from heel to mid-foot.
|
|
4. Gently and slowly begin to stretch the foot OUT and DOWN. (Do not try to bring it up yet.)
|
|
5. To keep edges of cast from hurting the skin, bend them out with pliers. 
|
|
7. Once or twice a week take off the outer ring of plaster, bend the foot down and out a little more, and cover with a new ring of plaster. 
Repeat step 7 until the foot bends outward a little. This usually takes several weeks. |
|
6. Put a ring of cotton or soft gauze over the foot and cover with new plaster bandage. 
Hold the foot in the new position until the plaster hardens. |
|
Stage B 
1. Remove the whole cast and check the position of the heel. 
Often the heel still bends in even after the bend of the foot has been corrected. |
2. If so, keep casting the foot in a down and out position until the heel is straighter.
|
|
Stage C 1 . After the sideways twist of the foot and heel is corrected, begin to raise the foot, using casts. 2. As you wrap the foot with plaster bandage, hold it in a raised position with 2 fingers.
3. Hold the foot up as the plaster dries.
As you hold the foot, keep it turned outward so that the little toe is always higher than the big toe. Take care to keep the toes straight.
4. Keep raising the foot little by little using the same casting method as before.
(CAUTION: Be very careful cast does not pinch or dig into skin here.) 5. Raise the foot a little in this way once or twice a week until it is as high as this, or until it stops raising for 3 or 4 cast changes.
|
|


|
|
|
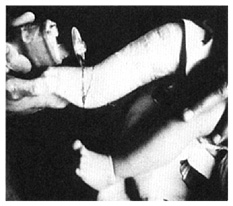
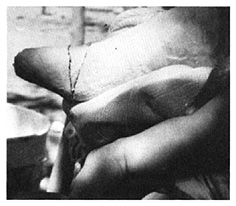
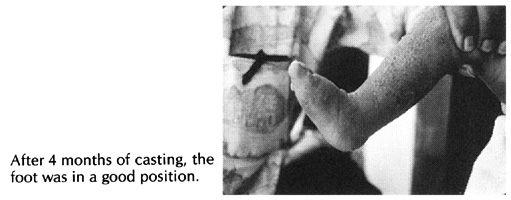
Then they gradually lifted her foot by cutting out rings on the cast, closing the space, and holding it closed with a new strip of plaster. (See Page 567.)
|
IMPORTANT After a club foot has been corrected, great care is needed to prevent it from coming back. Both exercises and braces are essential. After strapping or casts have been removed, continue the recommended stretching exercises twice a day (see Page 115). Braces for use after correcting club feet are on Page 116. Many children need to wear braces until they stop growing (age 13 to 18). If the problem keeps returning, surgery is probably needed. |
|
This child who had club feet needs to use braces day and night, at least until he begins to walk, and still at night after that. Check his feet regularly, for years, for any sign that the foot is beginning to turn in again. Improved bracing may be required. |
Disabled Village Children
A guide for community health workers,
rehabilitation workers, and families
by David Werner
Published by
The Hesperian Foundation
P.O. Box 11577
Berkeley, CA 94712-2577